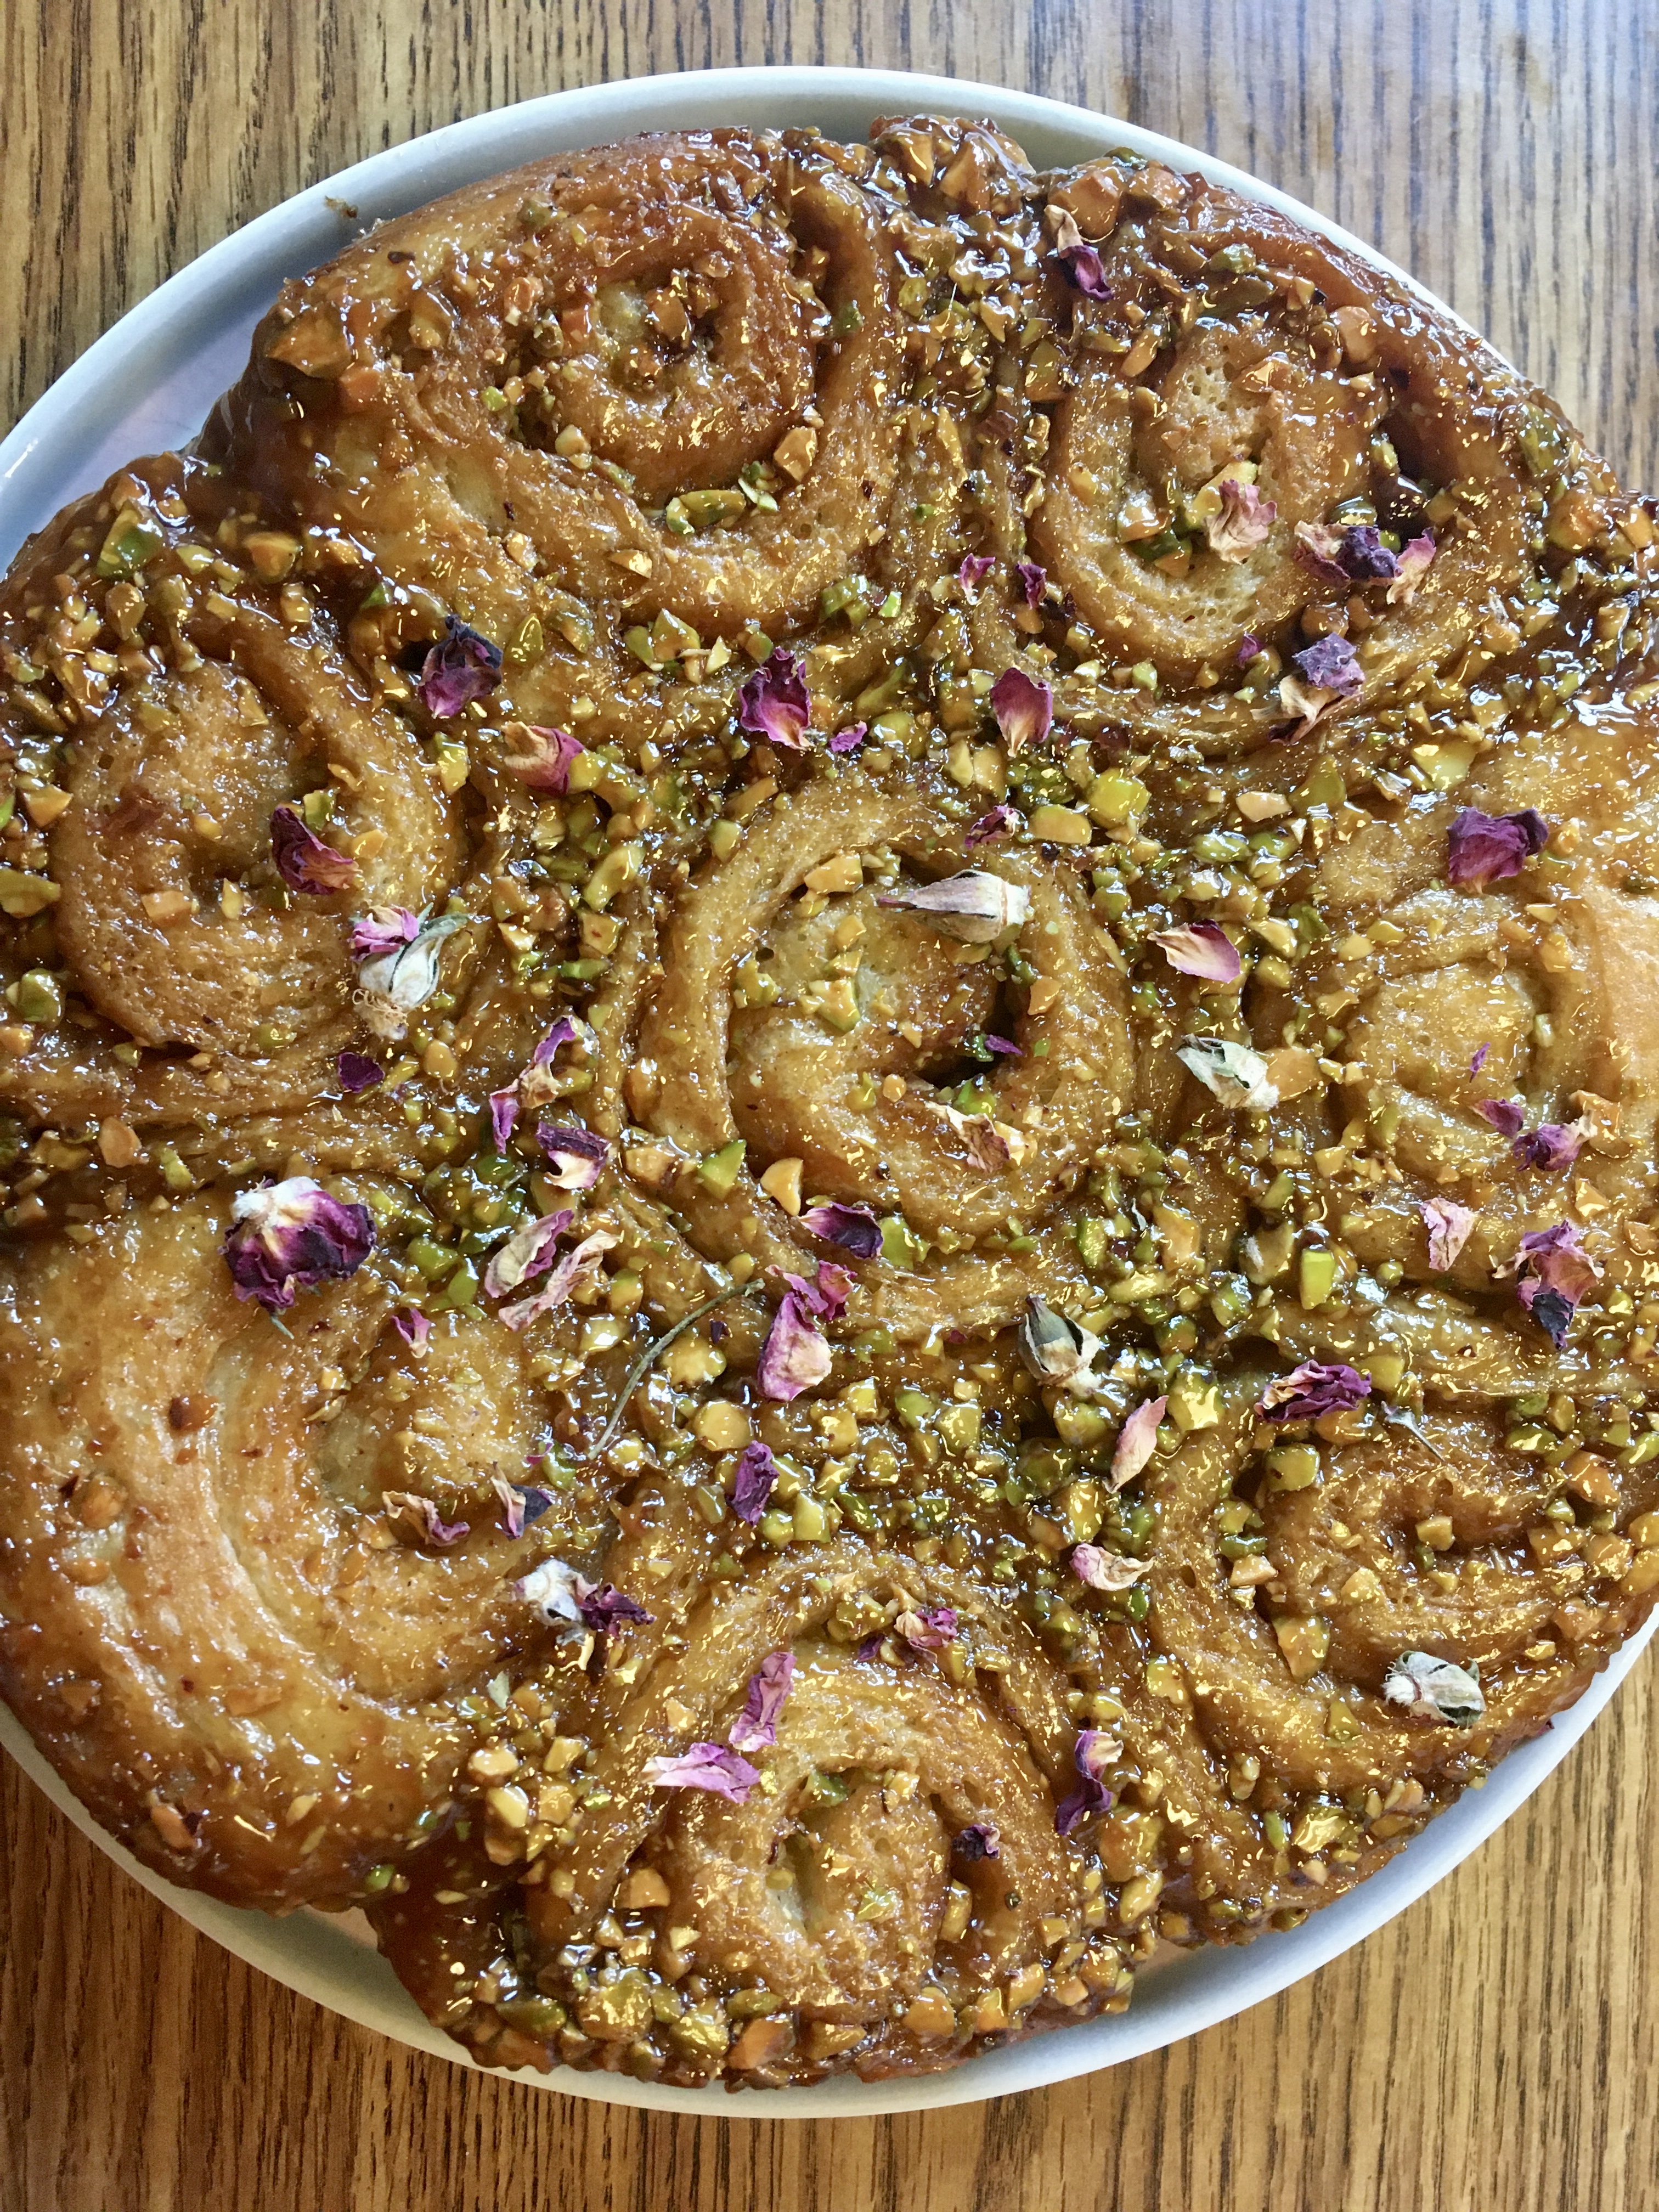
Looking for a gooey breakfast treat this weekend that has just the right balance between sweetness and nuttiness? These cardamom, rose and pistachio sticky buns are the warm and comforting bake that you’ve only ever dreamt of – just in time for fall!
Okay, I’m not going to lie here. When I made these, I ate about four of them in one sitting. These buns are that good (or maybe I was just really hungry, but I’m going to go with it’s because they tasted AMAZING). They taste like a version of a cinnamon roll with a sticky syrup instead of the icing, and a slightly floral and nutty flavor replacing the cinnamon. Warm and fresh out of the oven or heated up the next day in the microwave, they really hit the spot.
If you like super sweet buns, then you’re going to want to sprinkle a little regular sugar or brown sugar over the top of these bad boys before you dig in, but if you’re like me and like it when desserts are subtly sweet and not overpowered by sugar, then these will be perfect by just following the recipe.
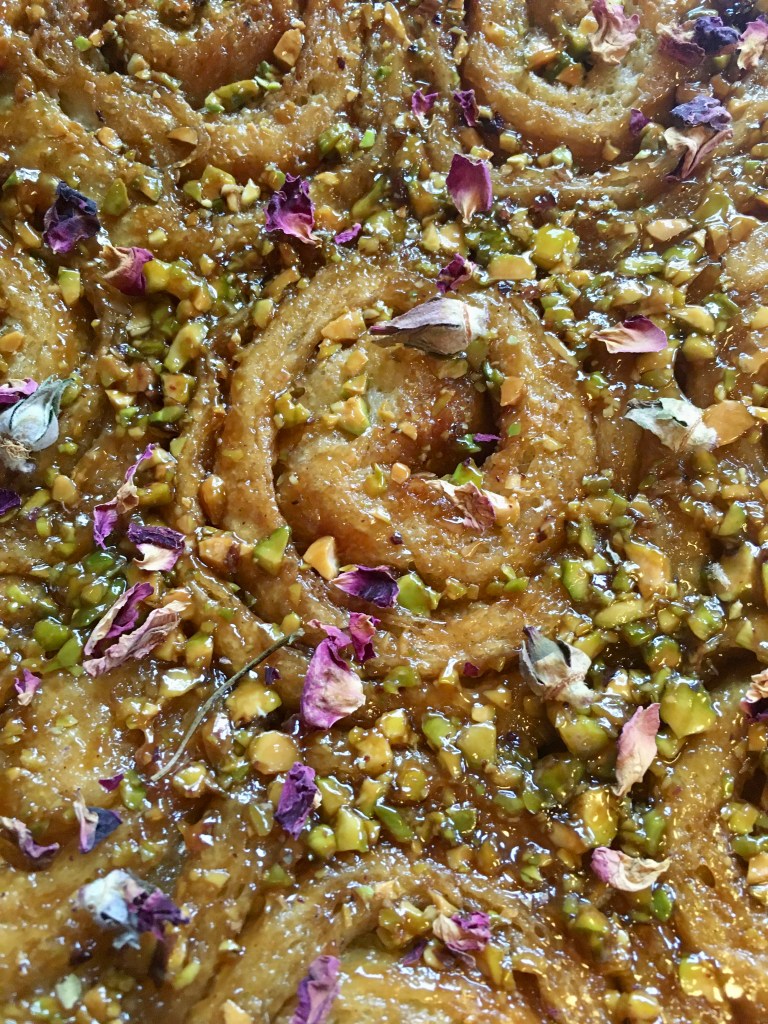
Look at that sugar and pistachio goodness!
It’s extremely important to turn these buns out onto a serving plate as soon as you take them out of the oven. If you leave the buns to cool before turning then out onto a plate, they’ll just stick to the pan and refuse to come out. So, when you take them out of the oven, what are you going to do? That’s right. Turn them out IMMEDIATELY. This is serious bun business here.
Puffed up and ready for the oven
I wanted to be a little extra, so I topped my buns with dried rose petals; they just made the buns look so pretty! But you absolutely do not have to do this, the taste isn’t impacted at all by this addition (even though they do say you eat with your eyes first…hmmm…).
I found this on Chetna Makan’s amazing blog and just made a little adjustment to the filling. She also has a great YouTube channel that you NEED to check out called ‘Food with Chetna’. Baloo the bear from The Jungle Book would tell you it’s a bare necessity for you to go explore her channel.
And now what you’ve all been waiting for, the recipe!
Cardamom, Rose and Pistachio Sticky Buns
Servings: Makes 8 buns
Ingredients:
For the buns:
225 g all-purpose flour
30 g sugar
A pinch of salt
25 g unsalted butter, softened
1 large egg
4 g dried fast action yeast
75 ml whole milk
1 tsp. ground cardamom
For the filling:
75 g unsalted butter, softened
10 g sugar
30 g dark brown sugar
20 g pistachio, finely chopped
For the syrup:
60 ml maple syrup
60 g unsalted butter, very soft
20 g dark brown sugar
20 g pistachios, finely chopped
1/4 tsp. rose syrup
Directions:
Step 1: To make the dough and put the flour, sugar, salt, yeast and cardamom in a bowl and mix with a spoon. Lightly whisk the egg and add it to the flour and then slowly add the milk, bringing it together to form a dough. Then work in the soften butter with your hands until fully incorporated into the dough.
Step 2: Place it on a clean work surface and knead it for 5 minutes, until the dough is soft and smooth. Place the kneaded dough in a bowl and cover with plastic wrap or a damp linen kitchen towel. Let it rest for 1-2 hours until the dough has doubled in size.
Step 3: In a separate bowl make the syrup by combining the maple syrup, butter, sugar and rose syrup. Mix this all together very well until it is all thoroughly combined. Spread it on the bottom of a 10-inch cake pan. Use a fixed bottom pan and not a loose bottom one, otherwise the caramel will leak. Then sprinkle the pistachios evenly on top and set aside.
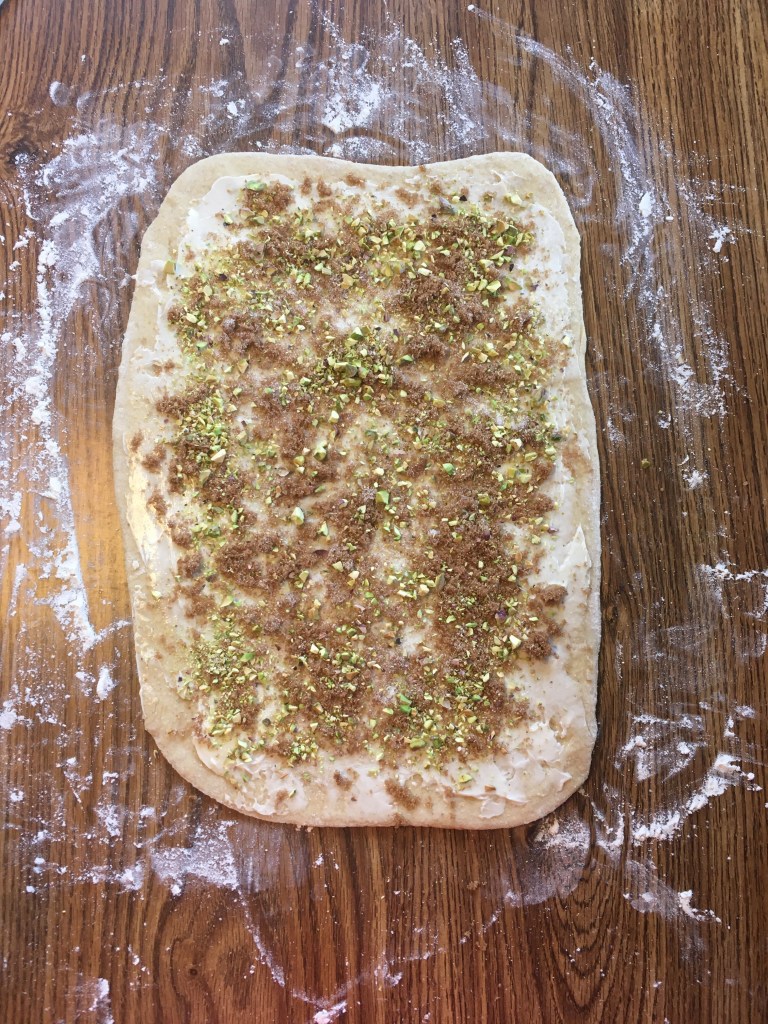
Step 4: On a clean work surface, roll out the dough into a rectangle that’s about 25 cm x 35 cm. Spread the butter on top of the rolled out dough and then sprinkle the sugar, followed by the chopped pistachio pieces on top.
Step 5: Roll the dough from the long side like a swiss roll. Make sure it’s a tight and neat roll. Clean up the ends of the roll by chopping off the bad bits and then divide the remaining roll into 8 pieces. Place these pieces in a circle shape on top of the syrup layer in the prepared cake pan.
Step 6: Place the cake pan in a large plastic bag (I like to use a turkey-size oven bag) or with a damp kitchen towel placed over top of the pan. Let it rest for 1 hour. Meanwhile, preheat the oven to 350° F.
Step 7: After the dough has rested for an hour, bake the buns for 25 minutes or until golden and cooked. Be sure to turn the buns out straight out of the oven onto a serving plate. If you leave it in the pan for long, it will get stuck to the pan, so remove it immediately. Enjoy these buns while they are warm and fresh, or warm them up in the microwave if you have left any leftovers (which I doubt:)).
While I love Thanksgiving and the glorious smells that emanate from the kitchen all day long, sometimes I get a little tired of having the same foods year after year after year. This year, my family and I decided that we would shake things up a little, putting a fun twist on one of my favorite holidays.
Thanksgiving has always held a special spot in my heart. I think it’s because it is the one of the few major holidays that hasn’t been pervaded by presents (if you completely ignore the whole Black Friday insanity). While giving and receiving presents is nice, I love the wholesomeness of Thanksgiving. It’s a day when we simply gather together to enjoy a great meal with loved ones; meanwhile, thinking about and voicing our thankfulness for all that we have in our lives. It just gives me a warm feeling inside, that’s all.
Yes, Thanksgiving started out as a remembrance of the Pilgrims and Native Americans having a feast together, but I believe that Thanksgiving is more than that (especially in today’s world when we are actually acknowledging how wrongly the Native Americans have been treated) and can be celebrated anywhere in the world (and it is. Some countries have different versions of it, like the West African republic of Liberia, who celebrate their version of Thanksgiving on the first Thursday of November). Thanksgiving is a holiday spotlighting our thankfulness, which is universal.
That being said, and the fact that the United States is one big medley of different and beautiful cultures, I thought it would be fun to have a Thanksgiving with food from across the globe. So, in the spirit of making this Thanksgiving highlight some of the best cuisines from around the world, I’m starting early (some might say extremely early considering it’s only the end of August). But if you think about it, there are only 93 days until Turkey Day 2020. It’s crunch time people.
The plan is that I’m going to have a lot of posts as the months go on with different ideas and recipes for this year’s Thanksgiving, so I hope you’re ready:) (we’ll see how this goes).
Feel free to chime in and comment your family’s special go-to Thanksgiving recipe!
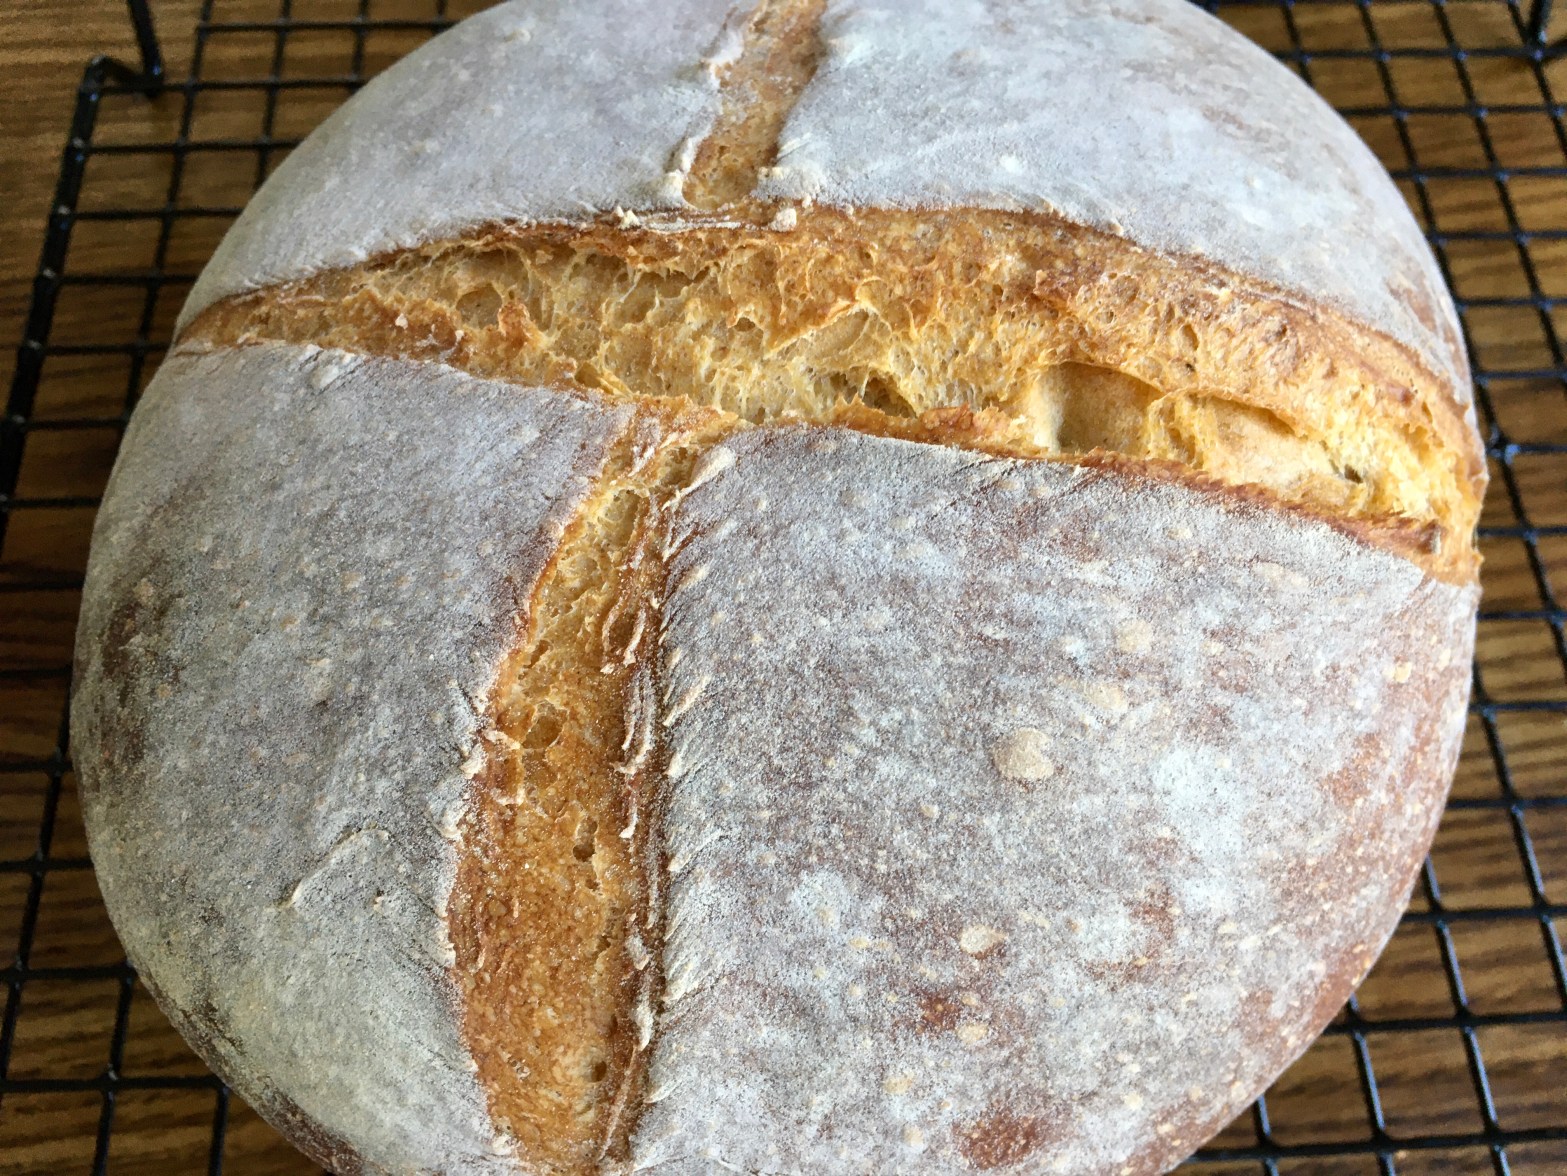
It’s been a long week and I need something a little different and exciting in my life. This tomato and basil loaf will hopefully do the trick if you’re in the same boat as me. You wouldn’t expect a bread to have a strong tomato flavor, but I’m telling you it works and will put a smile on your face, for sure.
Today, I thought it would be fun to make a bread that instead of water, uses the liquid from tomatoes (yes, tomato juice, but I thought if I said tomato juice, you’d think of those cans of tomato juice that you use when making Bloody Mary’s…maybe I over thought that one…). I don’t know why, but trying out something weird like this just sounded fun and I decided to go with it. This recipe is a really simple one; just a little something different to get me out of a funk after a long, mundane workweek.
I really like the flavor combination of tomato and basil, so that’s what I used in this recipe, but you could just as easily substitute the basil for garlic or oregano, or whatever else your creative spirit has in mind.
If you make this according to my directions, you’ll end up with a nicely crusted loaf because I like to have a crispy layer on the outside of my bread. Crusty bread might not be your jam though, and that’s okay, instead of baking it for 45 minutes, simply lower the baking time by 10 minutes. And Voila! No hard crust!
Baking is all about enjoying yourself and having fun, so if you’re in a bit of a foul mood when you start out, you should be smiling (or at least not as grumpy) by the time your creation comes out of the oven. If you’re not, you’ve gotta bake something else and wait for the baking fairies’ magic to kick in.
1/4 cup fresh basil, minced, or 2 1/2 tbs dried basil
Directions:
Step 1: Combine the yeast, sugar, and tomato juice in a large bowl. (If you have yeast that needs to be activated, leave out the tomato juice for the time being and pour in 60ml of warm water to the bowl. Let this mixture prove for about 5 minutes until the mixture is foamy. Then add in the tomato juice minus 60ml (250ml) and oil.
Step 2: Add the basil, salt, and flour to the bowl and mix together with your hands until all the flour has been incorporated and the dough is starting to pull away from the sides of the bowl. It will be one sticky mass. Let sit for 20 minutes at room temperature.
Step 3: After the 20 minutes are up, knead the dough for about 10-15 minutes on a lightly floured surface. It should feel elastic and smooth by the time you are finished. Place the dough in a large, lightly oiled bowl. Cover the dough with a damp tea towel or plastic wrap and let rise on the counter for 1-1 1/2 hours, until dough has doubled in size.
Step 4: After the dough has risen, shape your dough into a round loaf shape. To shape, dust the top of the dough with a little flour and pull each corner of the dough towards the center. Repeat these folds until the dough feels tight and begins to resist the folds. Flip the dough over and tap it into a round loaf. Place the dough on a baking sheet and cover with a plastic oven bag. Let this prove at room temperature until it has doubled in size, just under an hour. While waiting for it to prove, preheat the oven to 425 degrees Fahrenheit.
Step 5: Lightly dust the top of the dough with flour and using a sharp knife, score a deep cross into the loaf. Bake in the preheated oven or 15 minutes before lowering the temperature to 375 degrees Fahrenheit. Bake for another 30 minutes. The loaf will be baked around a total baking time of 35 minutes, but the extra 10 minutes will help to form a great crust on the bread. Take the bread out of the oven and let cool completely before digging in!
Midsummer and the zucchinis just keep on coming. If the zucchinis just won’t stop growing in your garden and you’re needing something exciting to do with all of the excess besides making yet another loaf of zucchini bread, this is for you. I promise, you’ll miss having so much fresh zucchini in the wintertime, so enjoy it while you can.
During July and August, there is never a time in my house when there is not a huge pile of zucchinis on the kitchen table. Don’t get me wrong I love zucchini, but sometimes, week after week of having a constantly replenishing stack of them on the table can strain my relationship with it.
It’s at these trying times (lol a bit dramatic, huh?), that I’m back on the prowl to find new ways to use my excess reserves of zucchini, and that’s exactly how I came upon this recipe. Flicking through my cookbooks, I saw this one and thought, “Perfect! It uses zucchini. Ding, ding. We have a winner!” I’m a very easy person to please.
That said, while I decided to make this recipe because of my huge pile of zucchinis, I absolutely love it. Even if I didn’t have zucchinis to use up, I would make this recipe again, no question.
The curry has the perfect amount of spice and tomato flavor, and while your typical kofta (either fried veggie balls or meatballs) can be a little heavy (but still delicious), this zucchini version is lighter and a perfect curry accompaniment.
My little fried zucchini koftas:)
This recipe comes from Chetna Makan‘s book, Chetna’s Healthy Indian Vegetarian, and is just one of many mouthwatering recipes from this book! If you’re a big Indian food fan, please get this book. Even if you’re not a vegetarian, I promise, you’ll love all the delicious and exciting recipes that this book has to offer.
Okay, my sales pitch is over, but seriously, make this curry.
Step 1: To make the curry, heat the ghee in a pan and cook the onions for 15 minutes on a medium heat until they have a deep golden brown color. Add in the green chili, garlic, and ginger and cook for another minute. Next, add in the tomatoes and the tomato paste. Then cover the pan and cook for 10 minutes on a low heat. Set aside to cool slightly.
Step 2: Once it’s slightly cooled, blend the mixture in a blender, then pour it back in the same pan. Add the water, salt, sugar, and all of the spices to the mix. Cover again and cook for 5 minutes.
Step 3: To make the koftas, grate the zucchinis and squeeze out the excess liquid (I like to do this by wringing them out in a kitchen towel). Put the zucchinis into a bowl with the flour, salt, chili powder, and amchoor. Mix this together well – the mixture will start to come and bind together when you stir.
Step 4: Heat a flat griddle or skillet and add the oil. Shape the kofta mixture into 8 balls and lightly press them into patties. Fry them slowly on medium-low heat for 5 minutes on each side. They should be golden brown and cooked through – don’t try to use a high heat as they will burn very quickly this way.
Step 5: Stir the cream into the curry. Pour it into a serving bowl and place the cooked koftas on top to serve.
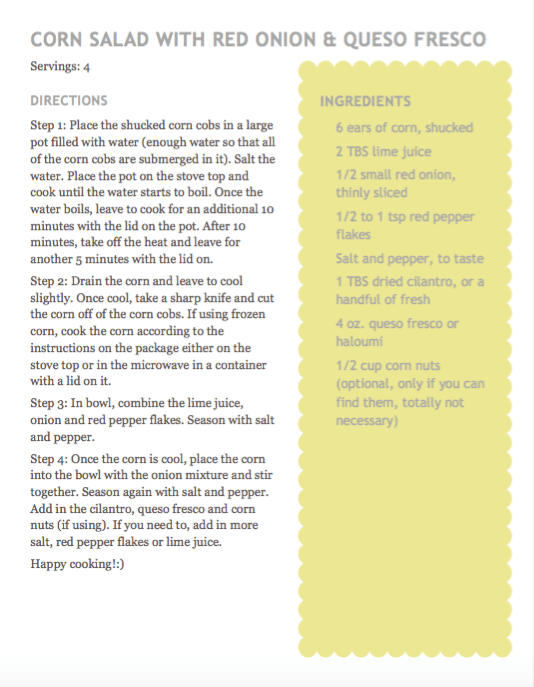
I love corn. Full stop. Corn on the cob, creamed corn — you name it, I love it. This recipe offers an exciting twist on a standard corn side dish. If you’re looking for your corn to have a little extra pizzazz, this is the recipe you’ve been looking for.
Summertime for me means fresh corn on the cob purchased from a farmer’s stand on the side of the road. A quintessential American summer, am I right? The taste of fresh, juicy corn in the summer is unbelievable, but sometimes after weeks of plain, steaming corn on the cob slathered in butter (which there is absolutely nothing wrong with), I just need something a little bit different for my corn.
I found this recipe in Alison Roman’s book, Dining In (surprise, surprise), and it’s definitely a winner. Every time we have corn now at family gatherings, my dad asks, “So, we’re having your corn, right?” So you know this recipe’s a good ‘un.
Yummy red onions with red pepper flakes!
In this recipe, the corn is combined with lime juice, red pepper flakes, cilantro, red onion and queso fresco. The lime juice gives the dish a nice sour tartness that’s balanced out by the heat coming from the red pepper flakes and the creaminess of the crumbled queso fresco (a delicious Mexican cheese).
If you don’t have fresh corn, no worries, frozen works perfectly here too! I hope you enjoy it as much as we do!
1/2 cup corn nuts (optional, only if you can find them, totally not necessary)
Directions:
Step 1: Place the shucked corn cobs in a large pot filled with water (enough water so that all of the corn cobs are submerged in it). Salt the water. Place the pot on the stove top and cook until the water starts to boil. Once the water boils, leave to cook for an additional 10 minutes with the lid on the pot. After 10 minutes, take off the heat and leave for another 5 minutes with the lid on.
Step 2: Drain the corn and leave to cool slightly. Once cool, take a sharp knife and cut the corn off of the corn cobs. If using frozen corn, cook the corn according to the instructions on the package either on the stove top or in the microwave in a container with a lid on it.
Step 3: In bowl, combine the lime juice, onion and red pepper flakes. Season with salt and pepper.
Step 4: Once the corn is cool, place the corn into the bowl with the onion mixture and stir together. Season again with salt and pepper. Add in the cilantro, queso fresco and corn nuts (if using). If you need to, add in more salt, red pepper flakes or lime juice.
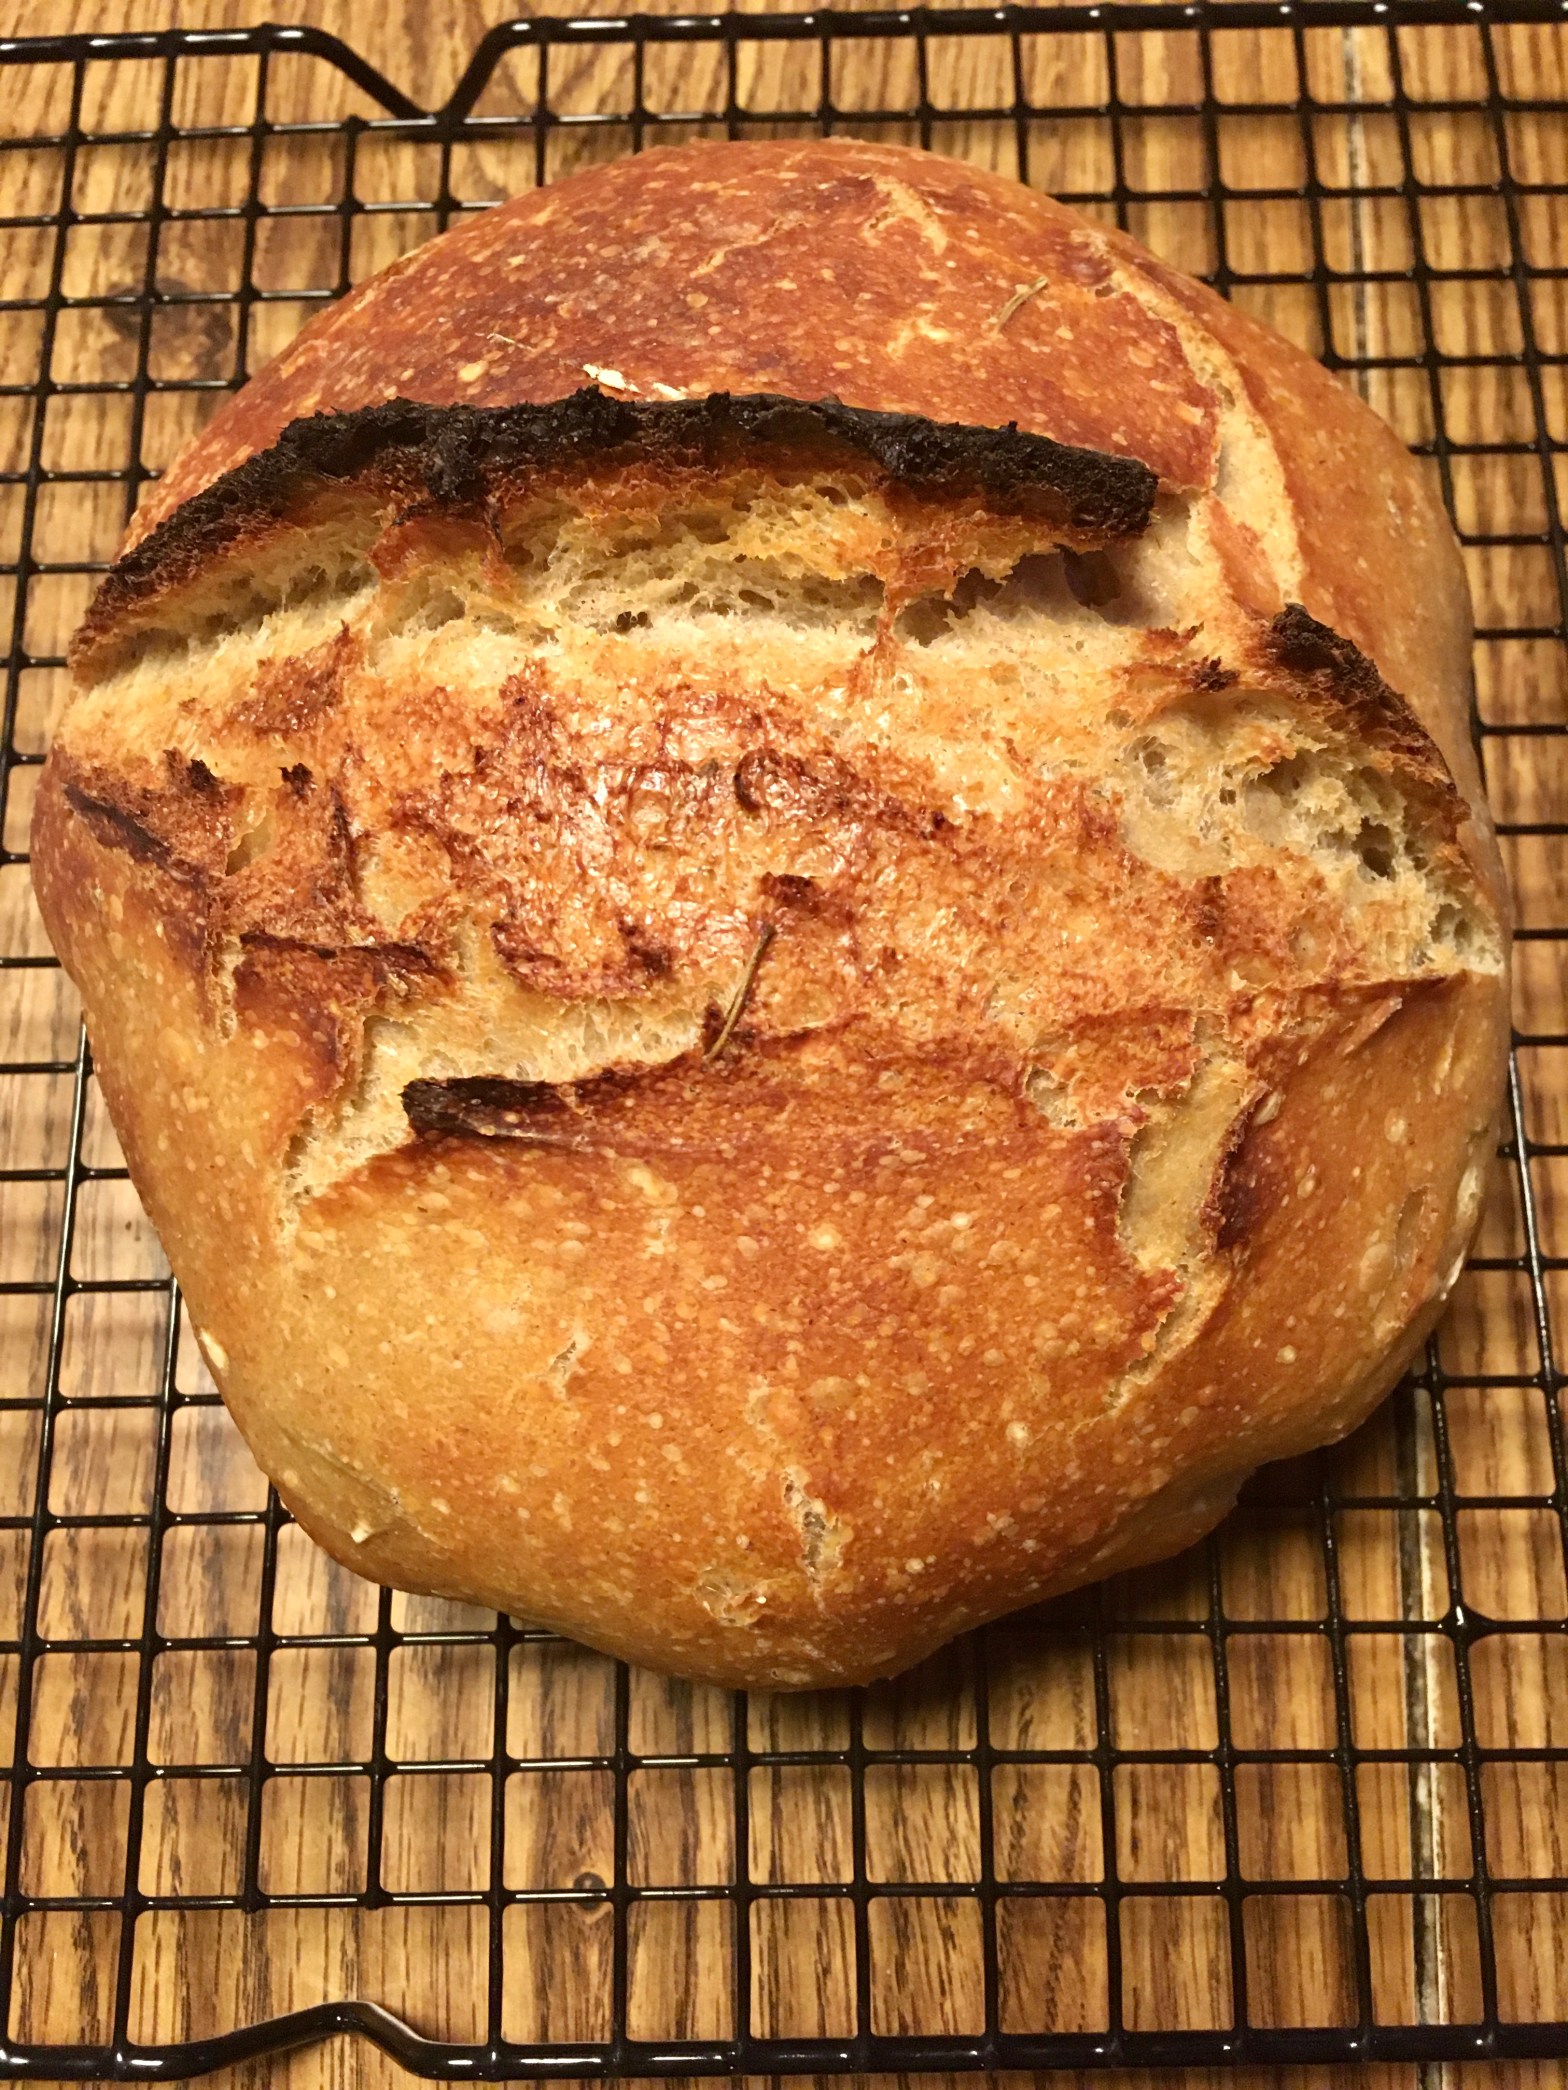
If you’re looking for an airy sourdough that doesn’t miss a beat when it comes to flavor, then this air sourdough recipe is for you. It’s a little trickier than the simple beginner’s sourdough recipe I posted about earlier, but definitely doable. This is for all those challenge seekers out there.
I’m always on the search for a new sourdough recipe and this particular recipe sans the rosemary and garlic, came to me by way Instagram. Weirdly enough, Instagram has opened me up to a lot of new and different recipes, food combinations, bakers and chefs. It’s something that I had not been expecting when I first joined Instagram, a little late in the game, during quarantine time.
This loaf I gleaned from James Morton’s (yes, James Morton from the Great British Baking Show. I know, I have a problem) Instagram page. I hope you like it as much as I do!
If you’re new to sourdough, this loaf has a hydration of 76%, so to make it easier to work with, you could reduce the amount of water in the dough. The resulting bread just might not be as airy as it would be if all of the water had been added.
I like to randomly add in spices to my sourdough and the last time I made this recipe, I happened to throw in some dried rosemary from my garden and some garlic. Feel free to add any spices or flavor combinations you wish or omit them all for a pared back, but still delicious sourdough flavor.
Dried rosemary and garlic powder to taste, optional
Directions:
Step 1: Combine all of the flours into a large bowl and then add in the water and active starter. Mix together with your hands or a wooden spoon. Once the mixture starts to come together, add in the salt and spices (if using). Mix again until fully combined.
Step 2: Let rise in the oven with the oven off, oven light on and the oven door cracked open. This will provide a nice warm environment for the bread to proove in. This is called the bulk rise. Leave for four hours. Every hour, remove from the oven, and stretch and fold your dough for about 1 to 1-1/2 minute each time (a total of 3 stretches and folds, don’t fold after the fourth hour). This will build up the gluten in the dough, helping you to achieve a nice, airy structure.
Step 3: After the four hour bulk rise, it’s time to shape the dough. Divide the dough in two. Then take a bench scraper and shape each piece of dough into a round ball by using a bench scraper and moving it in circular motions in between your work surface and the dough. Once you have a nice and taught surface on the top of the bread and a circular shape, rub the top of the dough gently with a coating of flour. Then tip the dough over so the floured side is making contact with the work surface. Pat the dough gently into a rectangle shape. Grab ahold of one side of the rectangle and take it halfway over to the other side of the rectangle. Then grab the other side of the rectangle and take that up and over the previous fold all the way over to the other side of the dough (making a sausage like shape). Turn the dough so the seam is running away from you and roll the dough up tightly.
Step 4: Place the dough in a banneton or bowl lined with a flour-covered linen towel with the seam side up and the floured side down. Cover the bowl with a plastic bag. Place this in the fridge for 12 hours.
Step 5: After 12 hours, place a Dutch oven in the oven and preheat it to 475ºF for 45 minutes to an hour. After 45 minutes, take the dough out of the oven and remove the Dutch oven from the oven. Place a piece of parchment paper over the bowl that the dough is in and with your hand on top of the parchment paper, invert the bowl so the dough falls gently onto the paper (and therefore, your hand). Take the lid off of the Dutch oven and place the dough into it. Make a slash down the middle with a sharp knife or razor blade.
Step 6: Put the lid back on the Dutch oven and put back in the oven for 20 minutes. After 20 minutes, remove the lid and bake for an additional 20-30 minutes, until the bread is a dark, caramelized color.
Step 7: Remove from oven and place on a wire rack to cool. Let cool completely before slicing and digging in.
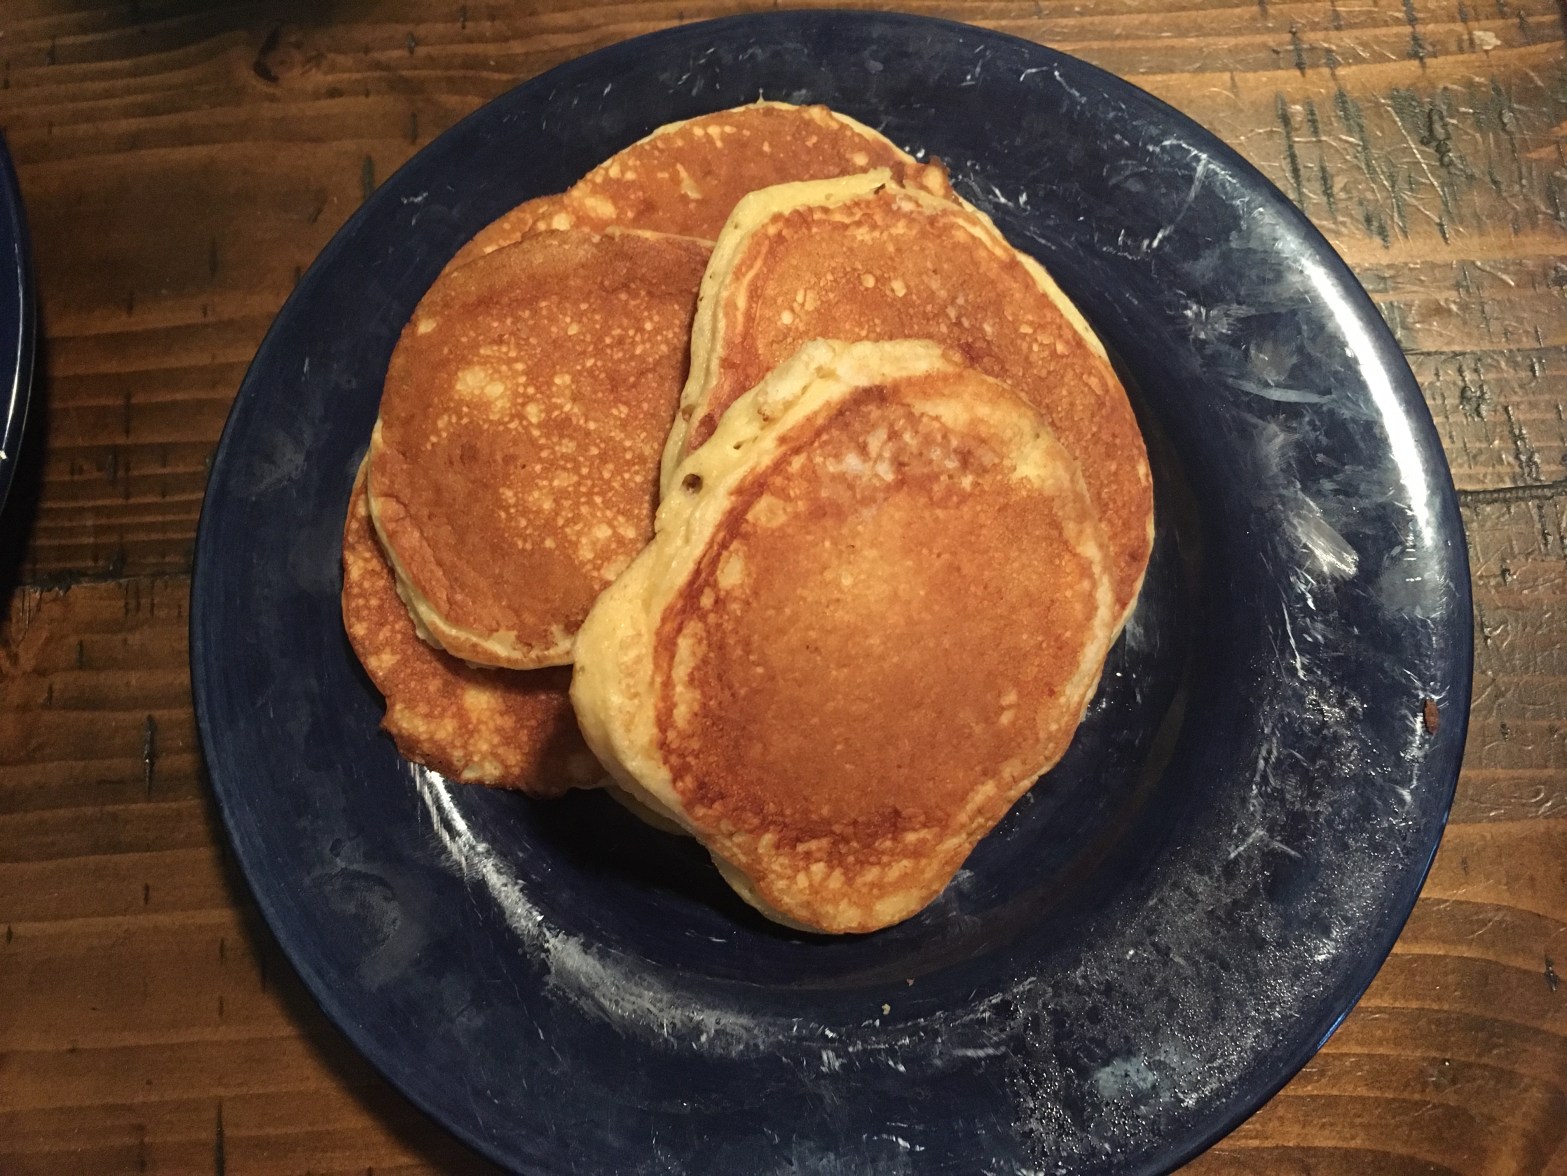
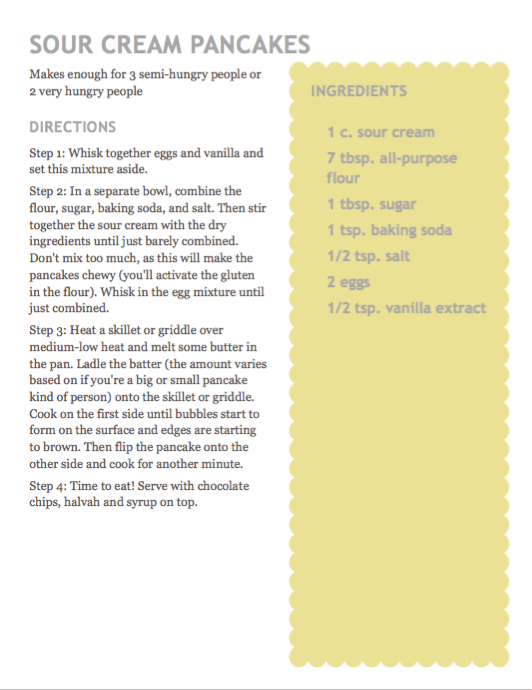
When you think about pancakes, you probably don’t automatically associate them with sour cream like you do with buttermilk. It’s a tried and true match, buttermilk and pancakes, like PB&J, but sour cream (and even yogurt) shouldn’t be left out of the world of pancakes. I do realize that sour cream and yogurt aren’t buttermilk, but I’m challenging the pancake status quo with this recipe (especially sour cream ones).
The absolute last thing that I want to do on a Sunday morning is venture out to the grocery store, so I use whatever I have in my fridge to knock-up breakfast. There are some days when I have to get really creative, but there’s no way I’m going to the store. That’s how I came across this recipe for sour cream pancakes. I was out of milk and the only thing I had that resembled milk was sour cream. Lo’ and behold, my love for sour cream pancakes was born.
Yummy pancakes pre-toppings
I like to eat these pancakes with maple syrup, chocolate chips and halvah sprinkled on top. Halvah is a Middle Eastern sweet made out of sesame paste. It’s soft, fudge-like and nutty; the perfect combination. I would highly recommend it for not only topping your pancakes with, but for topping a sundae, or for anything else that you might want to add a little sweet, nutty goodness to.
Please try this, it’s my favorite pancake topping.
Now here is what you’ve all been waiting for, the recipe (I know, you didn’t see that one coming, did ya?)
Makes enough for 3 semi-hungry people or 2 REALLY hungry people
Ingredients
1 c. sour cream
7 tbsp. all-purpose flour
1 tbsp. sugar
1 tsp. baking soda
1/2 tsp. salt
2 eggs
1/2 tsp. vanilla extract
Directions
Step 1: Whisk together eggs and vanilla and set this mixture aside.
Step 2: In a separate bowl, combine the flour, sugar, baking soda and salt. Then stir together the sour cream with the dry ingredients until just barely combined. Don’t mix too much, as this will make the pancakes chewy (you’ll activate the gluten in the flour). Whisk in the egg mixture until just combined.
Step 3: Heat a skillet or griddle over medium-low heat and melt some butter in the pan. Ladle the batter (the amount varies based on if you’re a big or small pancake kind of person) onto the skillet or griddle. Cook on the first side until bubbles start to form on the surface and the edges are starting to brown. Then flip the pancake onto the other side and cook for another minute. Repeat until all of the batter is gone.
Step 4: Time to eat! Serve with chocolate chips, halvah and syrup on top.
People of the world, may I have your attention, please. In this corner, we have the ooberly confident (and slightly intimidating), Paul Hollywood and in this corner, we have the young, non-traditionalist baker, Ruby Tandoh. Tonight, these two baking fiends will face-off in the battle of the croissants. Who will win? No one knows.Stay tuned, folks, to find out who will come out on top.
Picture this: it’s a nice and warm summer morning, you’re sitting on your porch with a big steaming cup of coffee and there’s a freshly baked buttery and flaky croissant sitting there on the table in front of you. It couldn’t get much better than that now, could it?
In an effort to make this idyllic summer morning a reality, I went searching for the perfect croissant recipe.
When embarking on this baking excursion, I turned to two bakers who I love and look to whenever I am on a quest for recipes and inspiration, Paul Hollywood and Ruby Tandoh. Paul Hollywood’s recipes use classic flavors and techniques, while Ruby Tandoh’s are more experimental and tend to buck tradition. Both are great bakers, but have very different approaches to baking, which is why I thought it would be fun to make both of their croissant recipes and see who did it better. Thus, the battle of the croissants was born.
The first recipe I made was from Ruby’s cookbook, Crumb. I love Ruby’s recipes because they honestly always turn out, which can’t be said of all recipes (I’m looking at you, Paul). It’s as if she’s worked all of the kinks out so that way baking and cooking can become easy and effortless for normal, everyday people. That said, Paul’s recipes do work, they just take a little practice. He’s not going to just give you all of his tricks of the trade, you have to work hard to achieve the results you want from his recipes.
As I alluded to earlier, Ruby is the kind of baker who likes to make life easier and her croissant dough recipe is no exception. Her croissant dough is meant to be versatile, it’s a hybrid recipe between a croissant dough and a Danish pastry dough, so that way you can use it for other recipes like franzbrötchen (German cinnamon buns), jam pinwheels, pain au chocolat, cherry diamonds, or for where ever your heart takes you. You’ll definitely reap the most reward from your laboring pastry dough making efforts with Ruby’s croissant dough recipe.
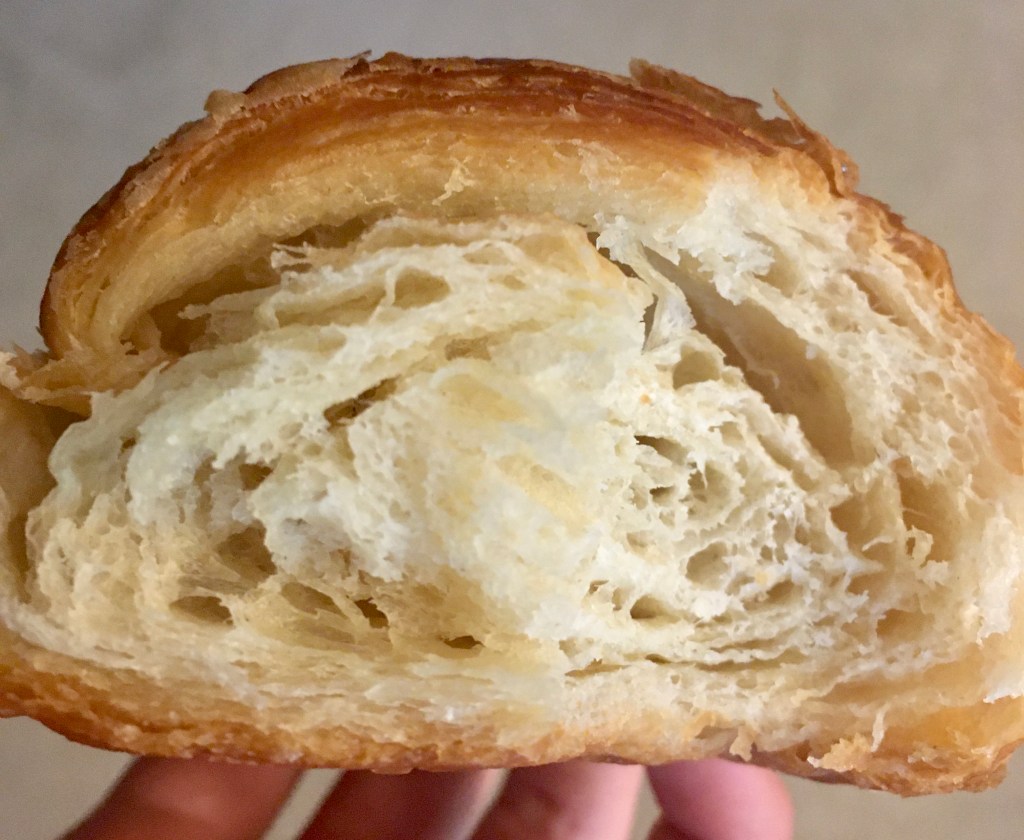
Paul’s croissant dough, on the other hand, is meant strictly for croissants or pain au chocolat. He has yet another recipe for Danish pastries. Ruby’s penchant for versatility means that her croissants are a little less traditional than Paul’s. They are very light and soft, but not a particularly chewy croissants, and even though they’re less traditional, they taste amazing. Just between you and me here, I thought they tasted better than Paul’s more traditional croissants (but that’s just my opinion, feel free to make your own judgements here).
Another point will be awarded to Ruby due to the fact that the amount of dough her croissant recipe makes and her instructions on cutting and shaping them result in smaller and daintier croissants, rather than mammoth ones that are born out of Paul’s recipe. All in all, it was a close call, but Ruby’s recipe takes the W in the looks department.
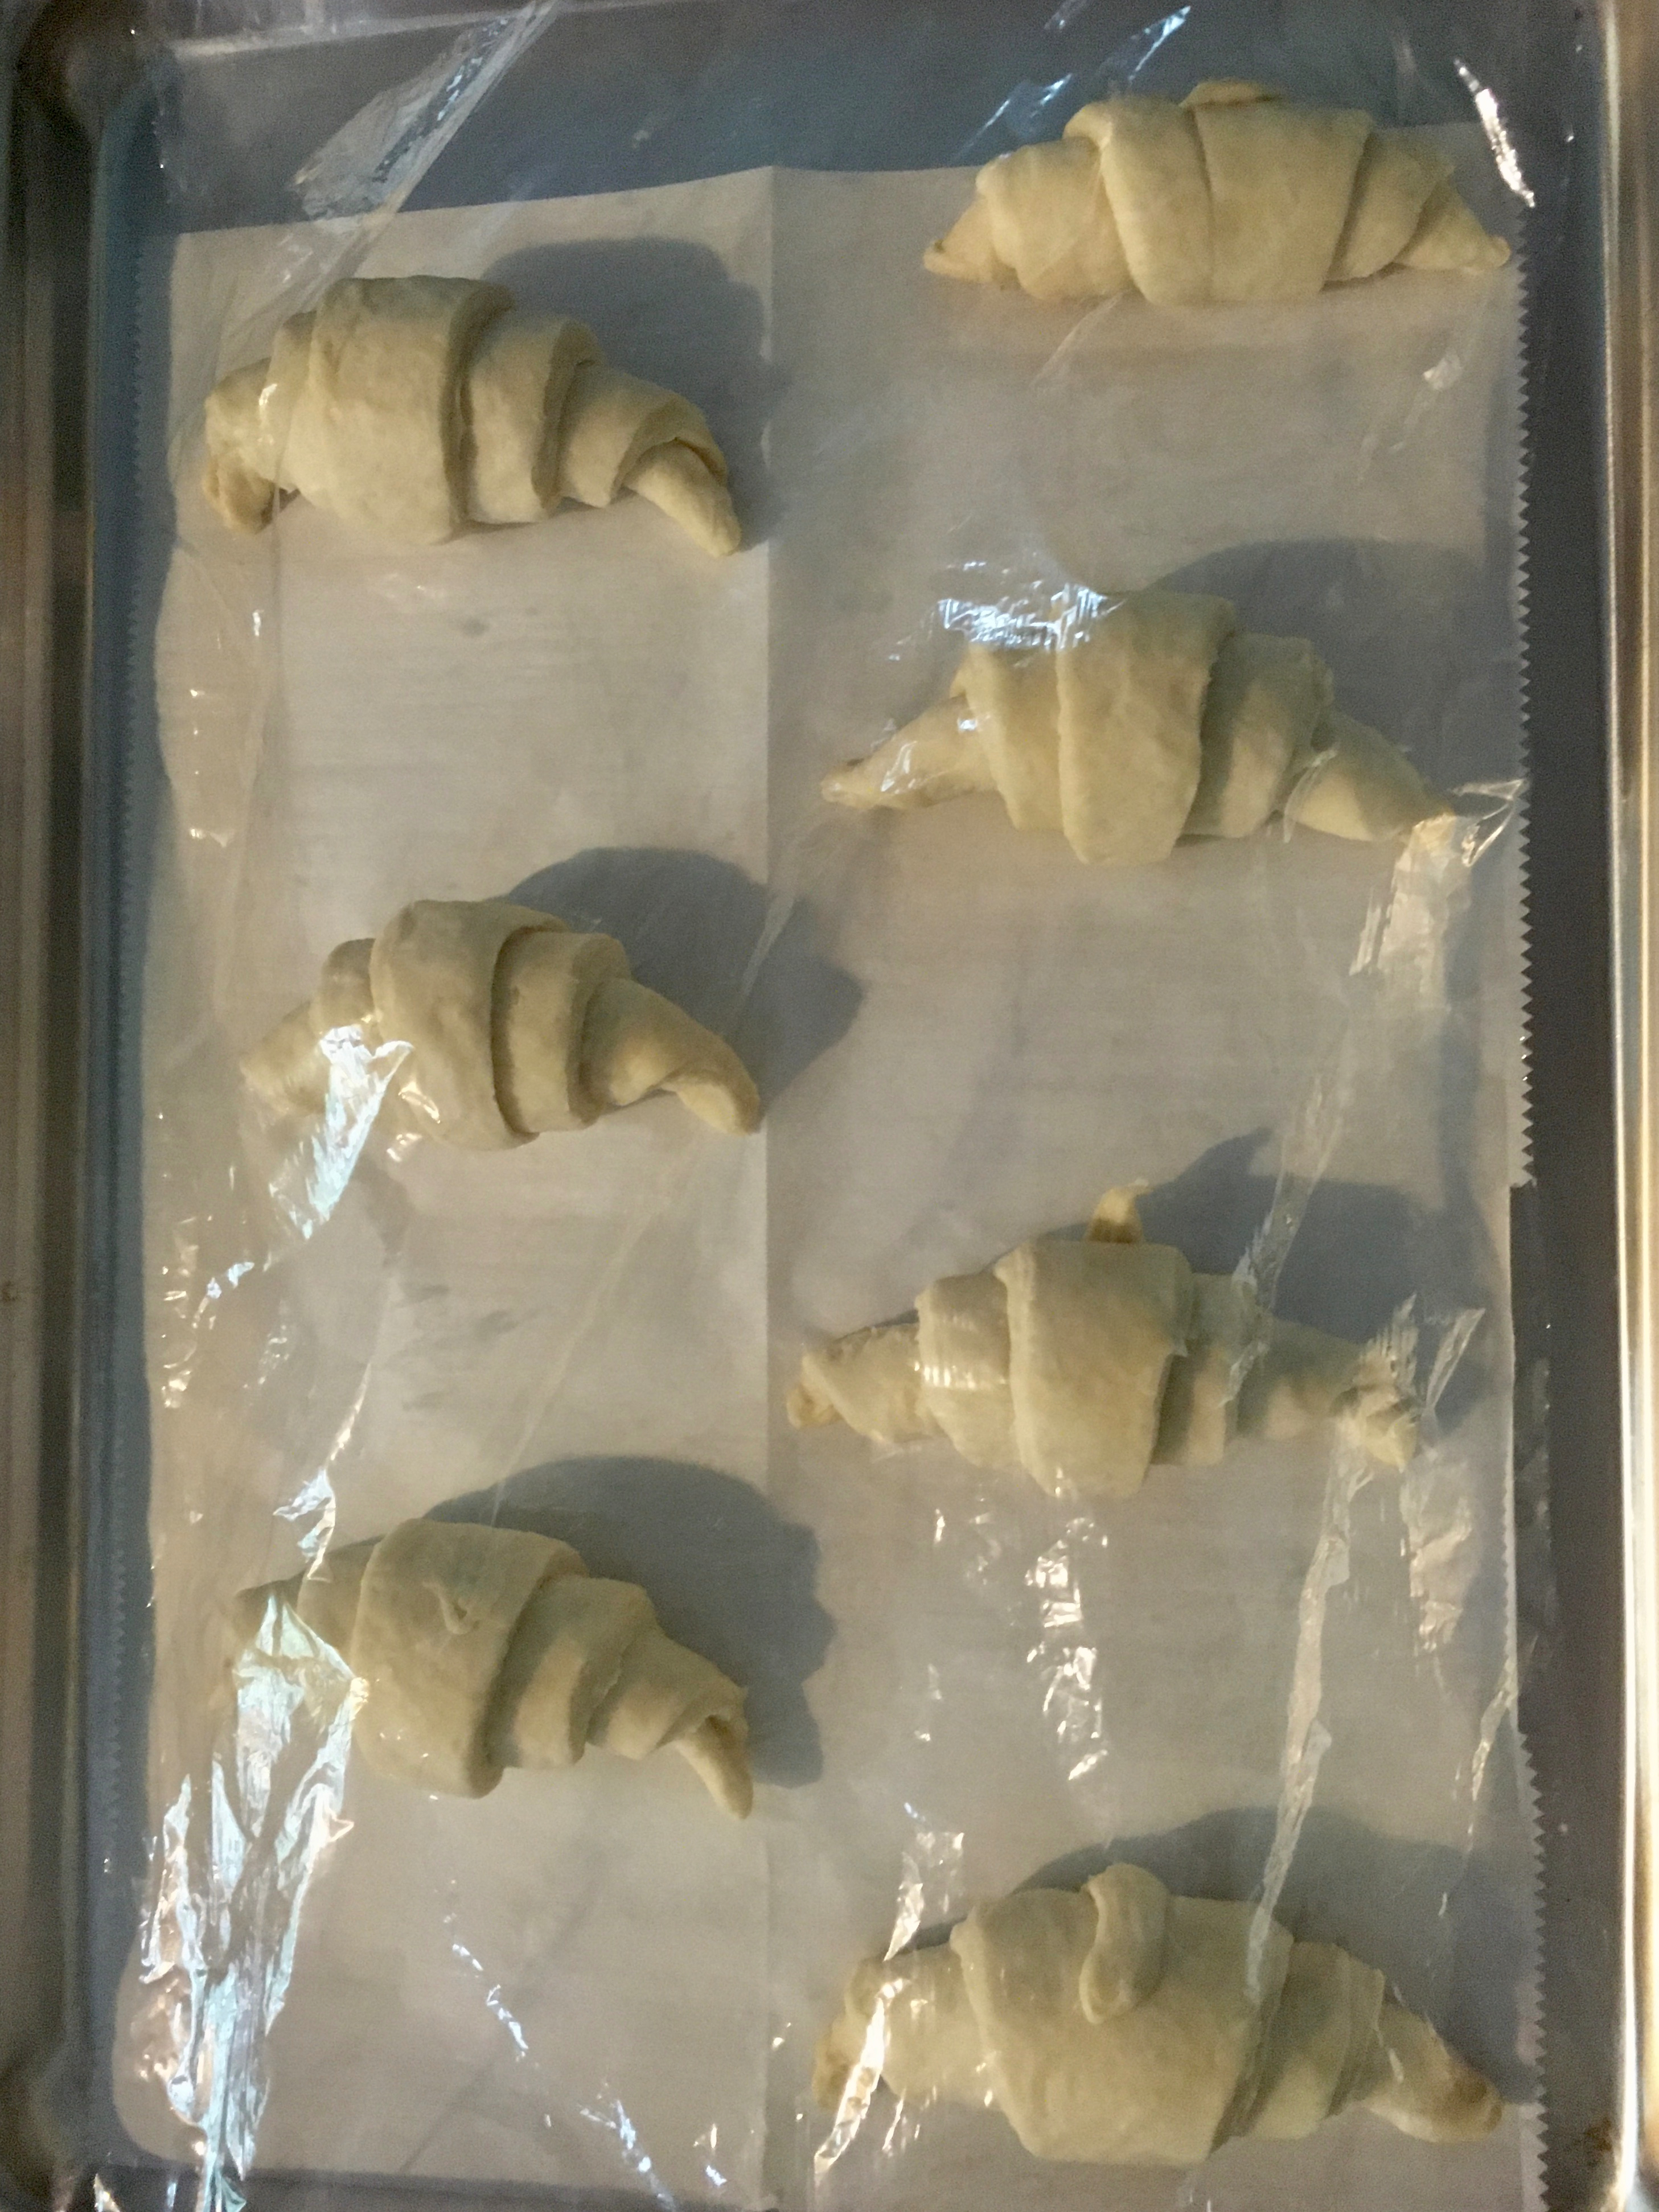
Ruby’s recipe is the photo on the left and Paul’s recipe is the one on the right.
Another factor that really helped Ruby to clench the win was that I was able to achieve a better flake with her croissants; although, this could be attributed to the fact that my butter broke apart when making Paul’s dough (if the butter gets too cold and you’re too heavy handed with the dough, instead of the butter melding and becoming one with the dough, the butter will break apart under the dough. When this happens, the butter will leak out of the dough when baked. Not good.). If I make Paul’s recipe again and the butter doesn’t break apart like it did this time, his croissant flake might be better, who knows? But based on this go-around, Ruby’s recipe definitely produces a superior flake.
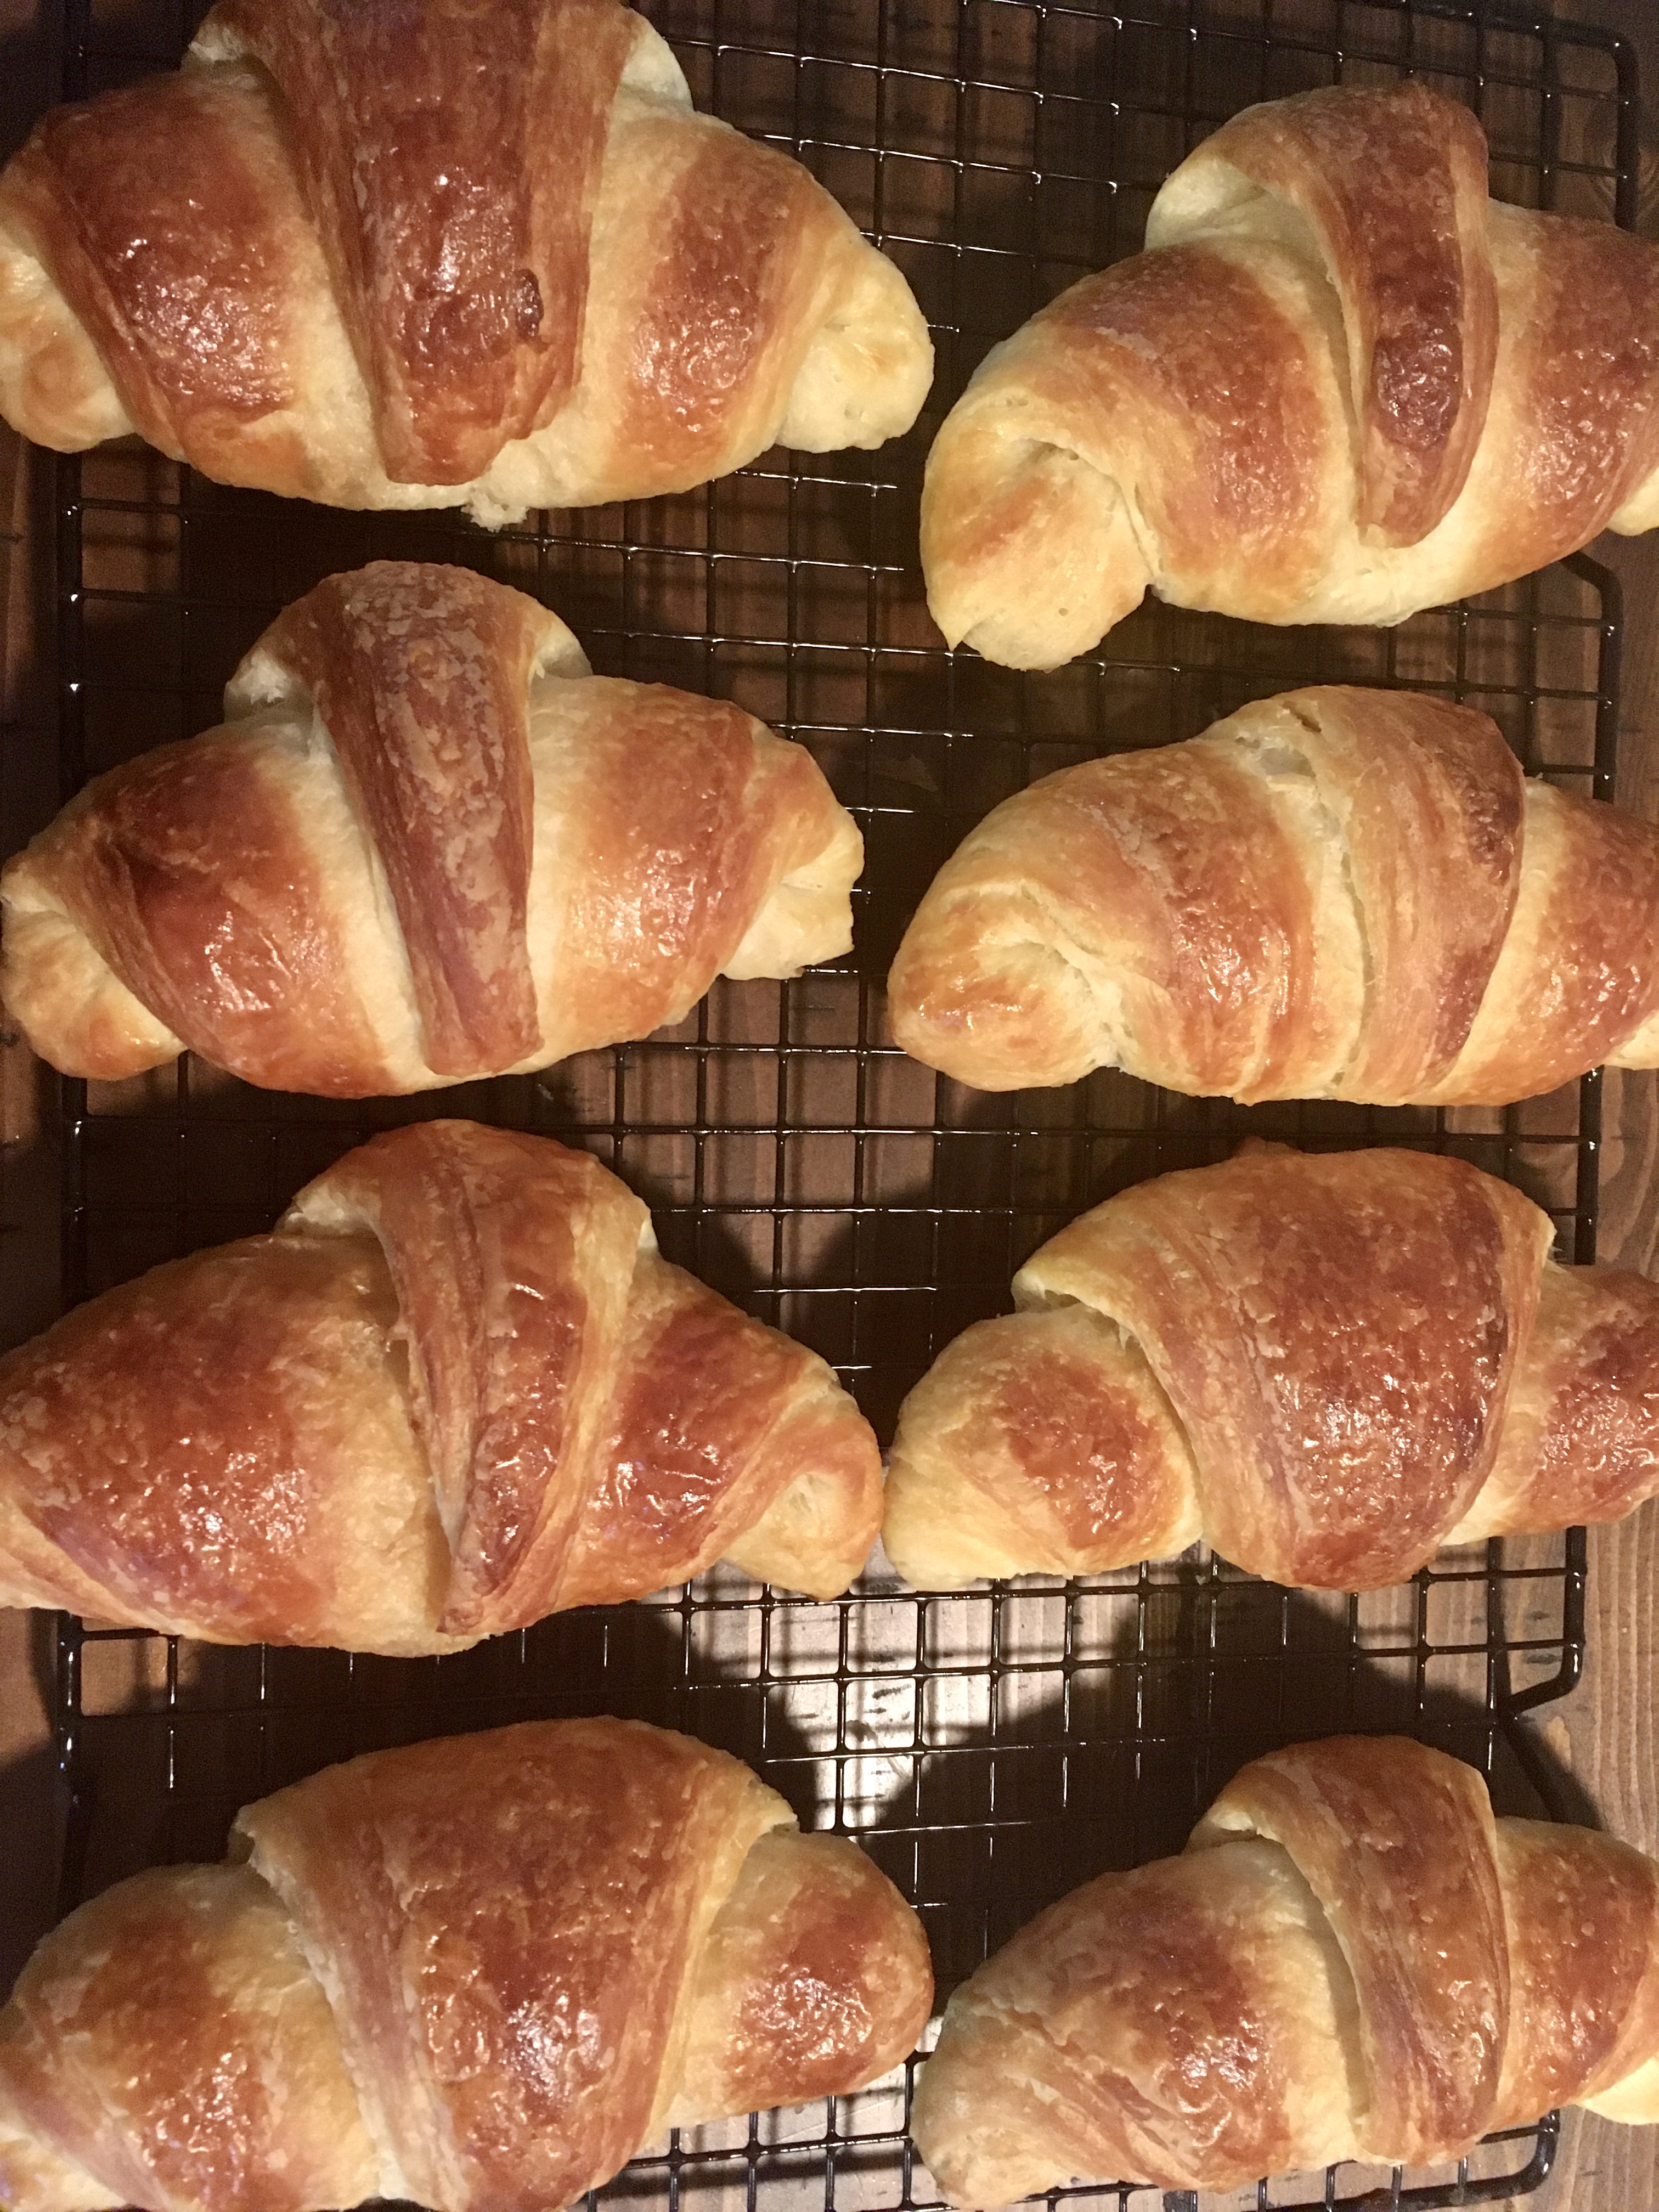
Ruby’s are picture perfect on the left and Paul’s are on the right.
I’ll let you be the judge on which is better; it all depends on whether you want a chewy croissant or not. Whichever one you choose, though, you won’t regret it one bit, and before you know it that idyllic morning I described at the beginning will become your reality. Enjoy all of those flaky layers!
I’m going to start with Ruby’s recipe since she won the showdown and Paul’s recipe will follow (I’ll put it in tomorrow).
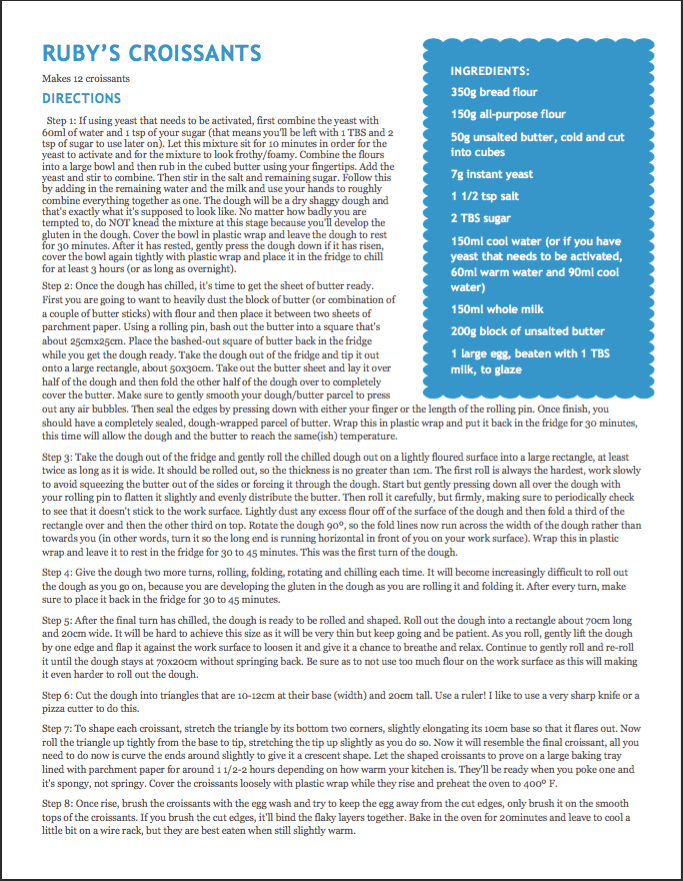
150ml cool water (or if you have yeast that needs to be activated, 60ml warm water and 90ml cool water)
150ml whole milk
200g block of unsalted butter
1 large egg, beaten with 1 TBS milk, to glaze
Directions:
Step 1: If using yeast that needs to be activated, first combine the yeast with 60ml of water and 1 tsp of your sugar (that means you’ll be left with 1 TBS and 2 tsp of sugar to use later on). Let this mixture sit for 10 minutes in order for the yeast to activate and for the mixture to look frothy/foamy. Combine the flours into a large bowl and then rub in the cubed butter using your fingertips. Add the yeast and stir to combine. Then stir in the salt and remaining sugar. Follow this by adding in the remaining water and the milk and use your hands to roughly combine everything together as one. The dough will be a dry shaggy dough and that’s exactly what it’s supposed to look like. No matter how badly you are tempted to, do NOT knead the mixture at this stage because you’ll develop the gluten in the dough. Cover the bowl in plastic wrap and leave the dough to rest for 30 minutes. After it has rested, gently press the dough down if it has risen, cover the bowl again tightly with plastic wrap and place it in the fridge to chill for at least 3 hours (or as long as overnight).
Step 2: Once the dough has chilled, it’s time to get the sheet of butter ready. First you are going to want to heavily dust the block of butter (or combination of a couple of butter sticks) with flour and then place it between two sheets of parchment paper. Using a rolling pin, bash out the butter into a square thats about 25cmx25cm. Place the bashed-out square of butter back in the fridge while you get the dough ready. Take the dough out of the fridge and tip it out onto a large rectangle, about 50x30cm. Take out the butter sheet and lay it over half of the dough and then fold the other half of the dough over to completely cover the butter. Make sure to gently smooth your dough/butter parcel to press out any air bubbles. Then seal the edges by pressing down with either your finger or the length of the rolling pin. Once finish, you should have a completely sealed, dough-wrapped parcel of butter. Wrap this in plastic wrap and put it back in the fridge for 30 minutes, this time will allow the dough and the butter to reach the same(ish) temperature.
Step 3: Take the dough out of the fridge and gently roll the chilled dough out on a lightly floured surface into a large rectangle, at least twice as long as it is wide. It should be rolled out so the thickness is no greater than 1cm. The first roll is always the hardest, work slowly to avoid squeezing the butter out of the sides or forcing it through the dough. Start but gently pressing down all over the dough with your rolling pin to flatten it slightly and evenly distribute the butter. Then roll it carefully, but firmly, making sure to periodically check to see that it doesn’t stick to the work surface. Lightly dust any excess flour off of the surface of the dough and then fold a third of the rectangle over and then the other third on top. Rotate the dough 90º, so the fold lines now run across the width of the dough rather than towards you (in other words, turn it so the long end is running horizontal in front of you on your work surface). Wrap this in plastic wrap and leave it to rest in the fridge for 30 to 45 minutes. This was the first turn of the dough.
Step 4: Give the dough two more turns, rolling, folding, rotating and chilling each time. It will become increasingly difficult to roll out the dough as you go on, because you are developing the gluten in the dough as you are rolling it and folding it. After every turn, make sure to place it back in the fridge for 30 to 45 minutes.
Step 5: After the final turn has chilled, the dough is ready to be rolled and shaped. Roll out the dough into a rectangle about 70cm long and 20cm wide. It will be hard to achieve this size as it will be very thin but keep going and be patient. As you roll, gently lift the dough by one edge and flap it against the work surface to loosen it and give it a chance to breathe and relax. Continue to gently roll and re-roll it until the dough stays at 70x20cm without springing back. Be sure as to not use too much flour on the work surface as this will making it even harder to roll out the dough.
Step 6: Cut the dough into triangles that are 10-12cm at their base (width) and 20cm tall. Use a ruler! I like to use a very sharp knife or a pizza cutter to do this.
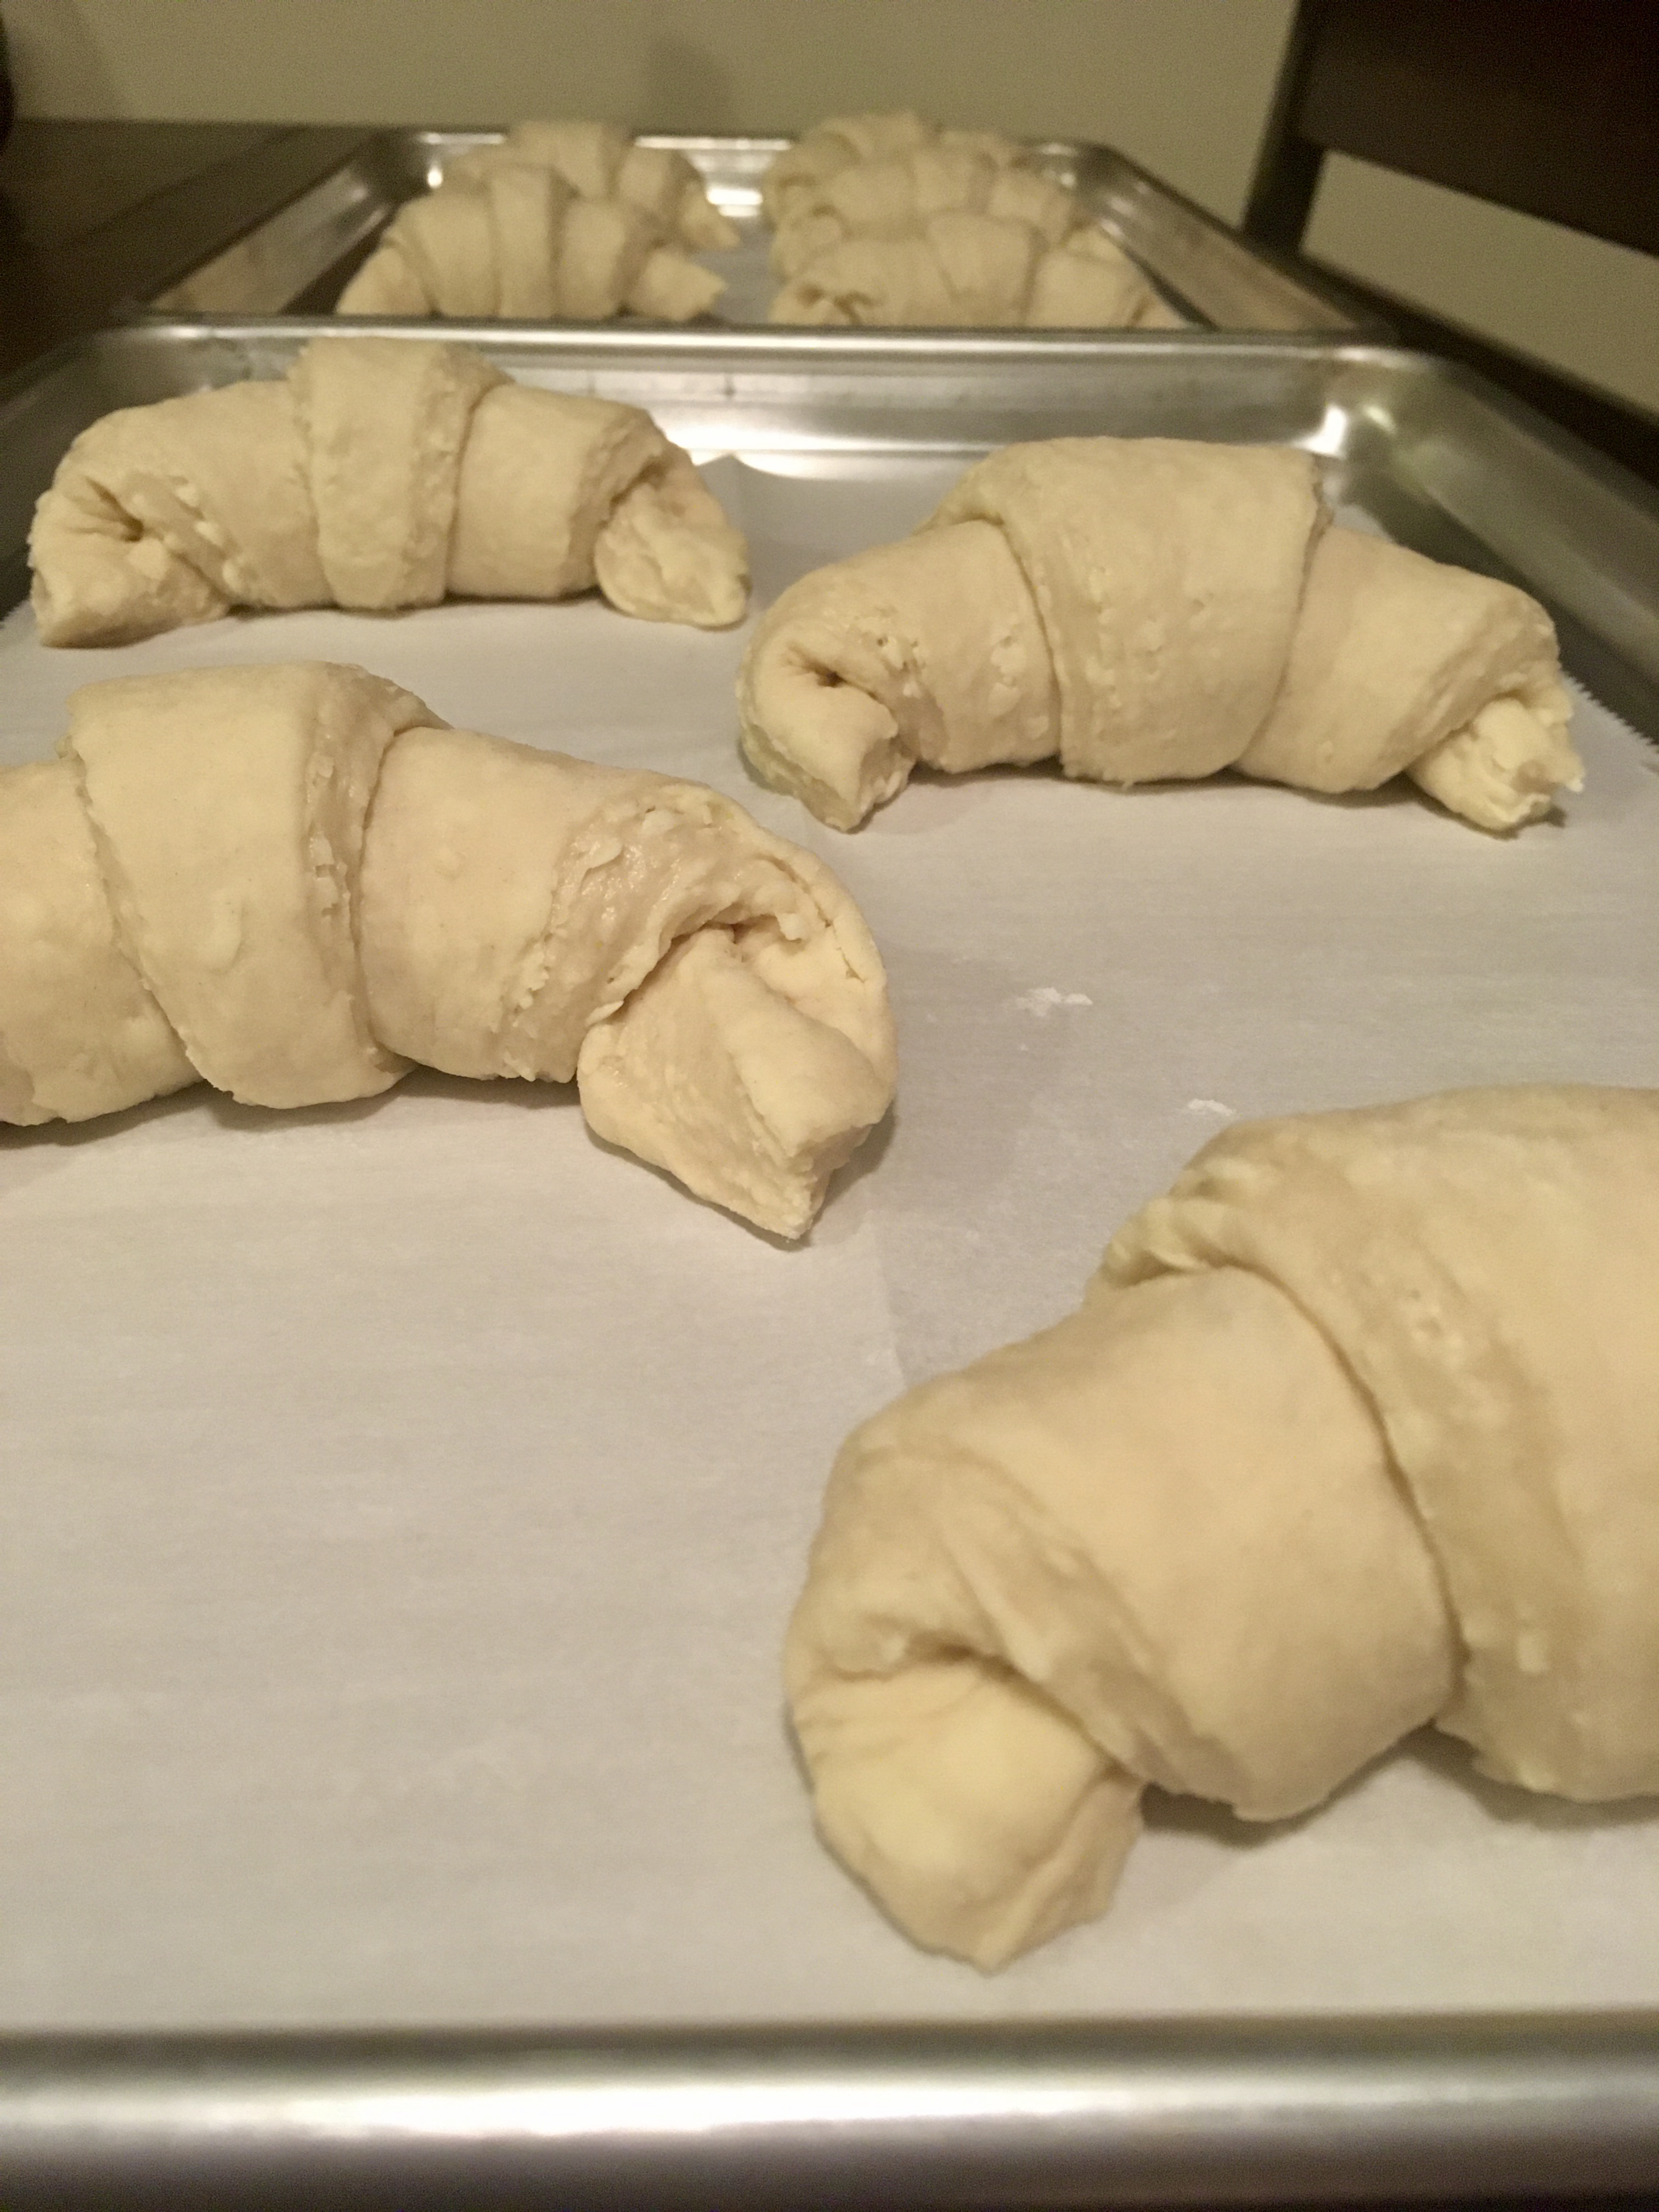
Step 7: To shape each croissant, stretch the triangle by its bottom two corners, slightly elongating its 10cm base so that it flares out. Now roll the triangle up tightly from the base to tip, stretching the tip up slightly as you do so. Now it will resemble the final croissant, all you need to do now is curve the ends around slightly to give it a crescent shape. Let the shaped croissants to prove on a large baking tray lined with parchment paper for around 1 1/2-2 hours depending on how warm your kitchen is. They’ll be ready when you poke one and it’s spongy, not springy. Cover the croissants loosely with plastic wrap while they rise and preheat the oven to 400º F.
Step 8: Once rise, brush the croissants with the egg wash and try to keep the egg away from the cut edges, only brush it on the smooth tops of the croissants. If you brush the cut edges, it’ll bind the flaky layers together. Bake in the oven for 20 minutes and leave to cool a little bit on a wire rack, but they are best eaten when still slightly warm.
Sometimes you need a soft, buttery bread with a little sweetness that just melts in your mouth to help you take your mind off of all of the things you have to get done.This brioche is the bread you’ve been looking for. No joke.
I really love brioche. It’s so great because if you have a stand-mixer with a dough hook, it’s astonishingly easy to make, while still tasting like a million bucks. I know it’s hard to believe, but it’s true. You’ve gotta trust me on this one.
For those who don’t know yet, or for those who just want to revile in the beauty that is brioche, brioche is a soft, buttery bread that has a hint of sweetness to it. It’s so soft that brioche bread almost feels like a pillow (not exaggerating). Oh, and the best part about it is that you don’t need anything fancy to eat it with, just some good, old butter and maybe a little jam. That said, it’s also great because of its versatility (which is good for those, like me, who have poor decision-making skills). Brioche can be easily made into French toast (it’s soft texture will easily soak up and retain the milk, egg, and cinnamon goodness), a fantastic grilled cheese, bread pudding, and can even be used to make croutons (who knew?!). Long story short, you really can’t go wrong with brioche.
So, I wasn’t just kidding about the whole, you need a stand-mixer to make this bread thing, you kind of do. The first time I made brioche, I didn’t have one. I just thought, “Well, it’s no big deal! I make bread all the time without a stand-mixer,” but boy, was I wrong. While it’s not impossible to make without a stand-mixer, the wet, sticky dough that’s characteristic of brioche is extremely hard to work with and handle. If you’re not used to working with a super sticky dough, it could get everywhere and become quickly overwhelming.
This is what the dough looks like after it’s 7 hours in the fridge. It’s a very soft dough because of all of the butter.
If you still have your heart set on making it without a stand-mixer, you’ll need to use a bench scraper, or if you don’t have that, a metal spatula, when kneading the dough. So, yeah, my life basically got 1000x better when I got a stand-mixer.
Now onto the exciting bit, the actual making of the brioche! Whenever I use this recipe (another one from Paul Hollywood’s How to Bake), I always cut it in half because otherwise, it makes a HUGE loaf. A huge loaf is great for if you’re having people over for dinner or something, but if you’re just making this for yourself, cutting the recipe in half is perfect.
There’s only one problem when it comes to cutting this recipe in half and that is the fact that the whole recipe calls for 5 eggs. This means that if you want to cut it in half, you’ll need 2 and 1/2 eggs (yay, math!). Hmmm. How do you do half an egg? Whenever I run into problems like this with cutting recipes in half, I break out my handy-dandy digital kitchen scale. I crack an egg into a bowl on the scale, beat it, and see how much it weighs. Then I just take out half of the egg’s weight and use that for the brioche. (You can save the other half to make some scrambled eggs, or some French toast with your soon-to-be, freshly-made brioche. There’s a thought!)
That’s the only funky part that comes up when cutting this brioche recipe in half, but I do have one last note on making this. Because brioche has a fair amount of sugar in it, this means that it will brown quicker than most breads. Don’t let it fool you into thinking that the brioche is done before it actually is. You have to outsmart the bread!
Does this proved dough look like a flour to you, or is it just me?
After your bread has been in the oven for about 16-17 minutes, it’ll start to have a very deep dark brown color (anymore brown and it’ll be considered burnt). It’s at this point that you’ll want to take your bread out of the oven, put a piece of aluminum foil over the top (to prevent the top from browning anymore) and pop it back into the oven for the remaining baking time (3-13 minutes).
And that’s all she wrote. See? Like I said, this bread is no biggie!
Here’s the recipe to make one large loaf of brioche:
Makes one, very large loaf | Total Time: 11-12 hours
Ingredients:
500 grams bread flour
7 grams salt
50 grams sugar
10 grams dry, active yeast
40ml warm water
100ml warm milk
5 eggs
250 grams unsalted butter, softened
Directions:
Step 1: Mix 1 tsp of the sugar into a bowl with the yeast and warm water. Let this sit for about 10 minutes allow the yeast to activate. When ready, the mixture will be foamy on top.*
Step 2: In the bowl of a stand-mixer, pour in the flour. Then place the salt and remaining sugar into one side of the bowl and the yeast mixture into the other side. Add in the eggs and warm milk and then with a dough hook attached to the mixer, mix on low speed for about 2 minutes. After 2 minutes, bump up the speed to medium and continue mixing for another 6-8 minutes. By the end of this, you should have a soft, elastic dough. Add the softened butter and mix for another 4-5 minutes on medium speed. You will want to scrape down the bowl, every once in a while, to make sure the butter is thoroughly incorporated into the dough. After this, the dough will be very soft.
Step 3: Place the dough into a plastic bowl, cover with plastic wrap and place in the fridge to chill for at least 7 hours, or overnight.
Step 4: Grease a deep cake tin (I like to use a large spring-form pan) and place a circle of parchment paper in the bottom of the pan to help you get the bread out after baking.
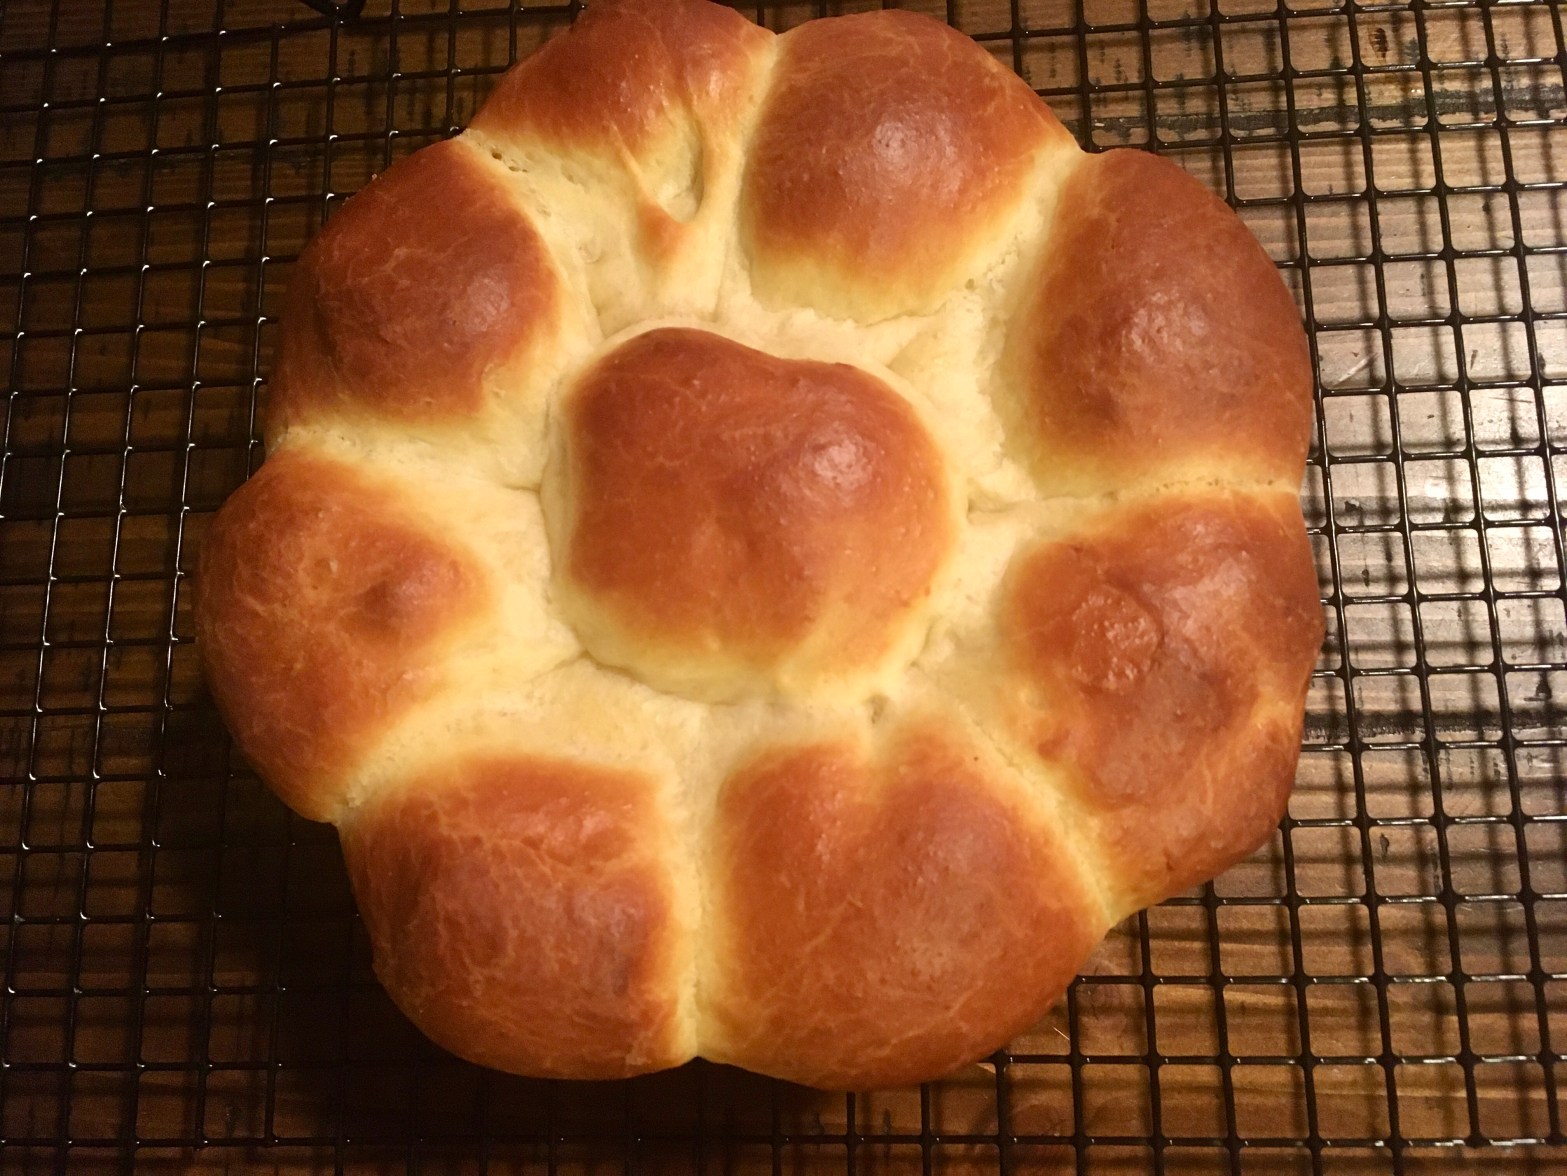
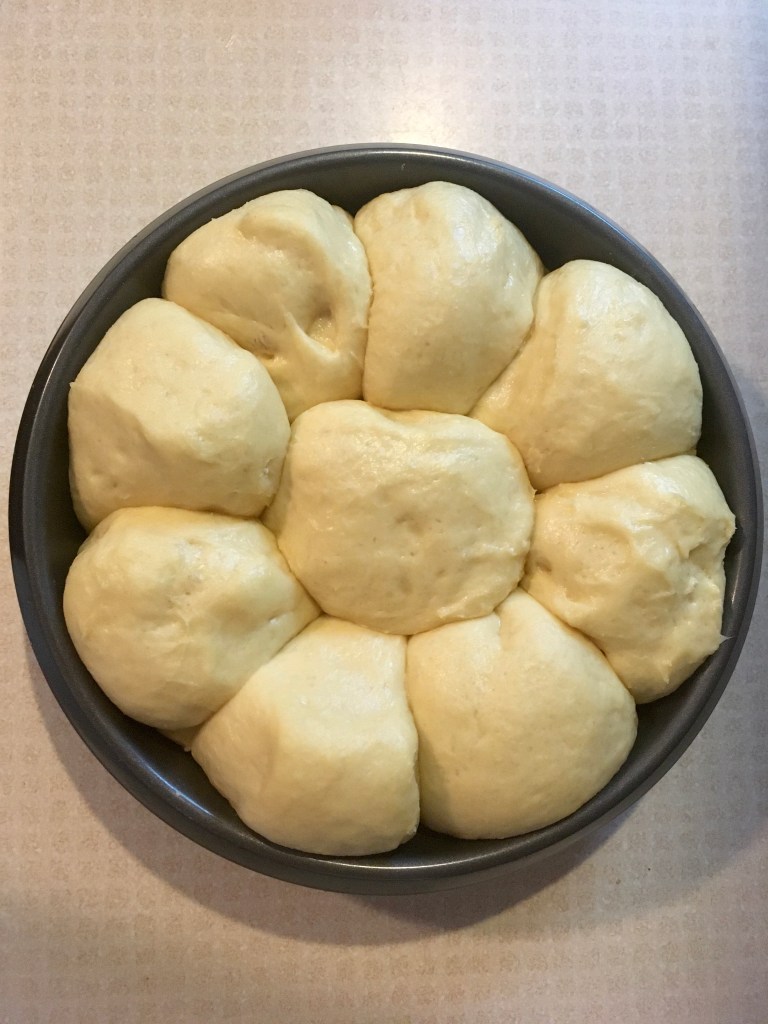
Step 5: Take your dough out of the fridge and turn it out onto a lightly floured work surface. To knock out any air in the dough, fold it in on itself a couple of times, and then cut the dough into 9 pieces. Shape each piece into a smooth ball by placing it on the work surface and making a cage with your hand around the top of it with the tips of your fingers making contact with the work surface. Then move your hand in circular motion, rotating the ball of dough rapidly, and this should create a smooth ball. Place 8 balls of dough around the outside of the pan and the ninth ball in the middle.
Step 6: Place the pan into a clean bag and leave to prove for 2-3 hours, or until the dough has risen to just above the rim of the pan.
Step 7: Preheat your oven to 375º F. Once the oven is fully preheated and the bread proved, bake for 20-30 minutes. Due to the sugar in the bread, it will brown quicker than most breads. If the bread takes on a very deep brown color before the baking time is over, place a piece of aluminum foil over the top to prevent further browning. Once fully baked, remove the bread from the pan and cool on a wire rack before digging in.
*If your yeast doesn’t need to be activated, omit this step and the 40ml of warm water. Add 40ml more of warm milk in place of the warm water.
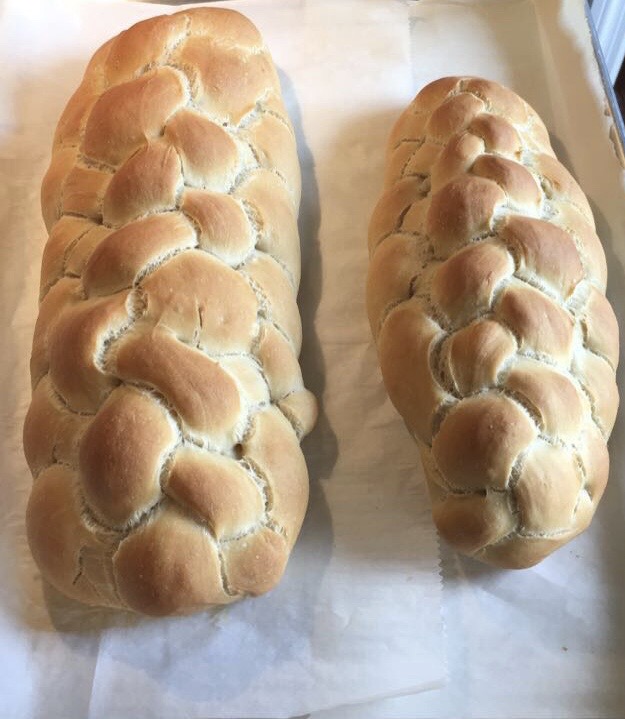
Okay, so you never learned how to braid hair. No biggie. This recipes give you step-by-step instructions, so you can make a gorgeous eight-strand plaited breadthat looks like it’s straight out of a bakery window. Your friends won’t be able to believe that it’s homemade.
I’ve always loved the look of a nicely plaited loaf of bread, don’t you? Whether it be a plaited loaf of challah or plain white bread, something about the little extra effort put in by simply braiding a loaf gets me. A plaited bread seems to give off an impressive air that says, “Hey! Look at me, I was made by a well-seasoned, experienced baker!” All it really boils down to this, a plaited loaf just looks more interesting than your run-of-the-mill, everyday circular loaf. Simple as that.
I’m not trying to bash a circular loaf here (trust me, I’m all for a nice round, crusty loaf of sourdough or white bread), but for special occasions or when I just need to spice up my life a little bit, a plaited loaf like this is perfect and doesn’t take a whole lot of skill or experience. Just follow these step-by-step instructions and you’ll be able to make your loaf standout from the crowd.
I was a little intimidated at first to try this eight-strand plaited bread recipe that I found in Paul Hollywood’s cookbook, How to Bake, but I just followed his instructs to a T, and everything turned out just fine! I ended up with a (pretty) straight and intricately weaved loaf of bread that I was excited to show off.
This plait can be done with any type of bread (I switch between just a plain, old white bread recipe and a garlic and rosemary challah bread recipe). No matter the type of bread you’re making (just not a wet, sticky dough, like sourdough), follow these steps and you’ll have success!
Eight-Strand Plait:
Once your dough has risen, knock it back and divide the dough into 8 equal pieces. Then roll each piece into a 16 in (40 cm) log/sausage. Lay the rolled-out pieces onto a lightly floured surface with the top ends gathered together. Tack the gathered ends to the work surface to hold them in place as you work/braid. With the strands of dough are laid out in front of you, number them 1-8. Number 1 will be the strand farthest to the left as you look at the strands and number 8 will be the strand farthest to the right. Every time you move a strand, the numbers will still be 1-8 in front of you (the number is referring to the position, not to the specific strand).
First, take 8 under 7 and over 1. This step you only do once at the start.
Then repeat the following steps until the plait is finished:
Take 8 over 5
Take 2 under 3 over 8
Take 1 over 4
Take 7 under 6
Be sure to keep the plait as even and straight as possible so that the strands are roughly the same length. When you’ve reached the end of the plait, use a bench scraper, or your hands, and chop the dough on each end to give you nice, sharp ends. Once you do this, tidy up the ends as needed. Then place the loaf on a parchment paper-lined cookie sheet and put into a plastic bag. Leave to prove for about 1 hour (until the dough has doubled in size) for white bread (this proving time will vary if making challah bread). (The featured image is a picture of what the white bread recipe looks like once baked.)
Not a very straight plait, but this is an eight-strand plaited loaf of garlic and rosemary challah bread
And that’s it! Easy, right? Now, you might need to give it a couple of tries at braiding the first time before it looks right, but you’ll get there!
Below is the recipe for eight-strand plaited white bread:
Step 1: Mix together the yeast, sugar and 75 ml of warm water into a small bowl. Let this sit for around 10 minutes in order for the yeast to activate. After 10 minutes, the mixture should be foamy on top. Then in a large mixing bowl, pour in the flour and add the yeast mixture on top. Use your hands to mix this together and then add in the salt, butter and ¾ of the remaining 325 ml of cool water. Mix this together with your hands. Add in the remaining water, a little at a time, until all of the flour has been picked up from the sides of the bowl. You might not have to add all of the water, or alternatively, you might have to add more water. You want the dough to be soft, but not soggy. Form the mixture into a rough dough.
Step 2: Coat a clean work surface with a little bit of olive oil and then tip out the dough, kneading it for 5-10 minutes. At first, there will be a wet stage, but if you keep kneading, eventually, the dough will start to form a soft, smooth skin. At this point, put the dough into a lightly oiled bowl (large). Cover with plastic wrap and leave to rise for about 1 hour (leaving it for 2 or 3 hours is fine too) or until at least doubled in size.
Step 3: Once the dough has risen, scrape it out of the bowl onto a lightly floured work surface. Knock all of the air out and divide it into 8 equal pieces. Then roll each piece into a 16 in (40 cm) log/sausage. Lay the rolled-out pieces onto a lightly floured surface with the top ends gathered together. Tack the gathered ends to the work surface to hold them in place as you work/braid. Step 4: As the strands of dough are laid out in front of you, number the strands 1-8. Number 1 will be the strand farthest to the left as you look at the strands and number 8 will be the strand farthest to the right. Every time you move a strand, the numbers will still be 1-8 in front of you (the number is referring to the position, not to the specific strand).
Step 5: First, take 8 under 7 and over 1. This step you only do once at the start.
Step 6: Then repeat the following steps until the plait is finished: Take 8 over 5, take 2 under 3 over 8, take 1 over 4, and take 7 under 6.
Step 7: Once you’ve reached the end of the plait, use a bench scraper or your hands and chop the dough on each end to give you nice, sharp ends. Once you do this, tidy up the ends as needed. Place the loaf on a parchment paper-lined cookie sheet and put into a plastic bag, leaving it to prove for about 1 hour (until the dough has doubled in size).
Step 8: While waiting for the bread to prove for the last time, preheat the oven to 450º F and place a roasting tin on the bottom rack inside the oven. After the dough has risen and the oven has fully preheated, fill the hot roasting pan with hot water (in order to create the stream needed for a good crust). Then take the bread out of the plastic bag and quickly put the bread into the oven. Bake for 30 minutes or until it is fully cooked and hollow sounding when tapped on the bottom. Cool on a wire rack before slicing.