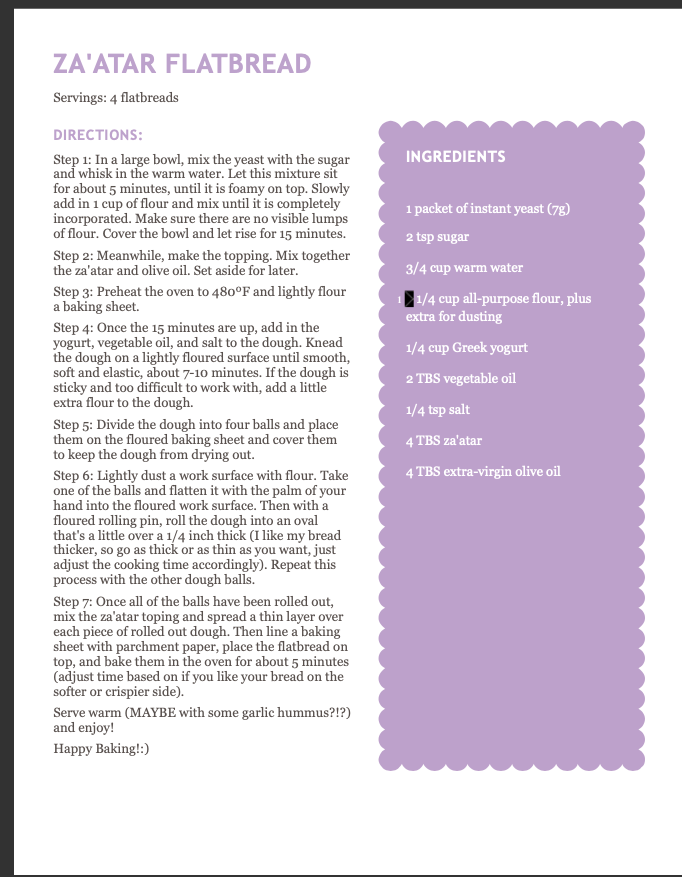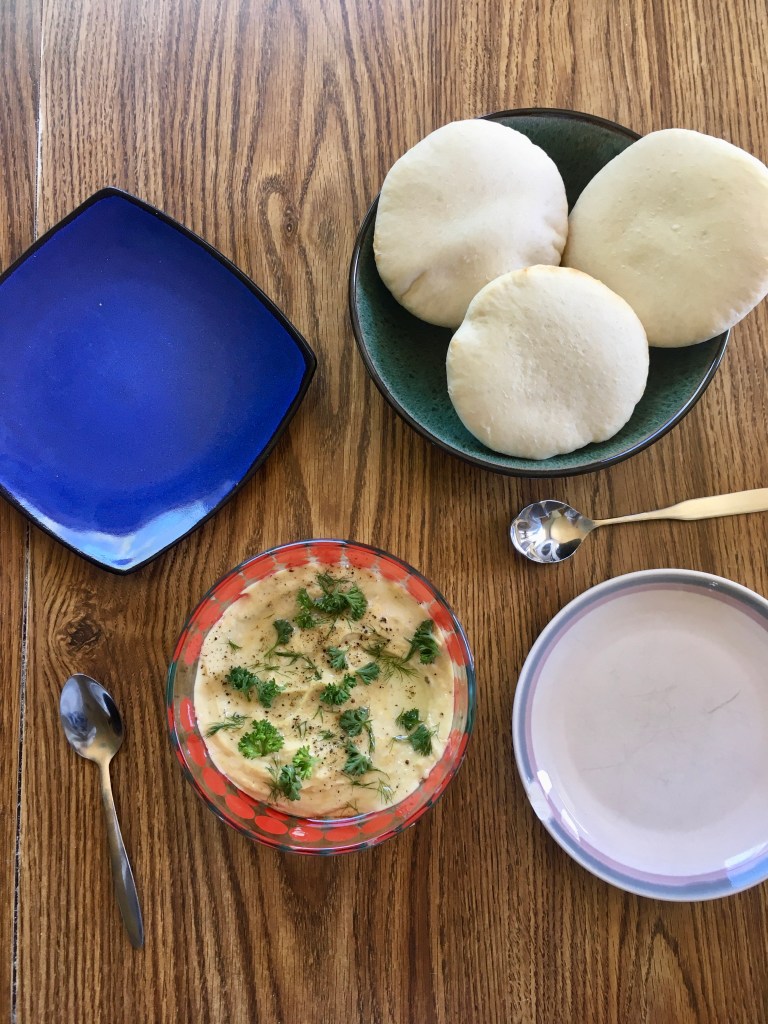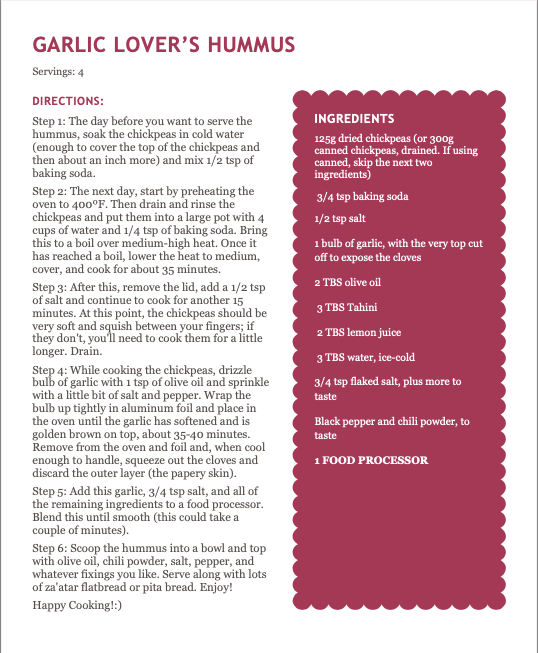

I love Halloween season. Full stop. There’s candy galore, horror films on TV every night, and it’s the only time of year when it’s socially acceptable — encouraged even — to dress in all black. What’s not to love? These spiderweb buns are a fun twist on a traditional hot cross bun recipe. Who says spooky season can’t start in July?
I love a good hot cross bun as much as the next person, but I’m just going to come right out and say it – they always look so boring. Don’t get me wrong, there’s beauty in simplicity; however, sometimes it’s okay to go over the top and let those creative juices run wild. These spiderweb buns add that little pizzazz to your life that you’ve been needing.
I know you’re saying to yourself, “Really, a recipe that use the oven in the midst of this end of July heat?” What can I say, we just got a new oven in our house (the old one was from the 50/60’s) and I just couldn’t help myself.

I found this recipe in Helena Garcia’s spooky book, The Wicked Baker. It can also easily be made vegan; I’ll put the vegan substitutes in parentheses.
I hope you enjoy and embrace your very own Halloween in July as much as I am! 🙂
Chocolate Chip Spiderweb Hot Cross Buns:
Makes: 8 buns
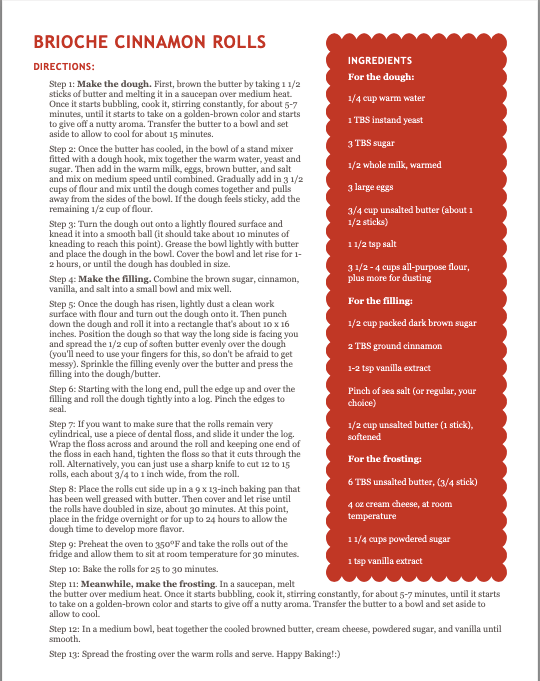
Ingredients:
- For the dough:
- 220ml (1 cup) whole milk (or non-dairy milk of choice), warmed
- 1 tsp instant yeast
- 110g (1/2 cup) sugar
- 320g (2 1/4 cups) white bread flour
- 1 tsp pumpkin pie spice
- 25g (1/4 cup) cocoa powder
- 40g (3 TBS) unsalted butter (or vegan butter/refined coconut oil), melted
- 1/4 tsp salt
- 1 egg (or mix 1TBS flax seeds with 3 TBS water and let sit for 5 minutes)
- 75g (1/2 cup) dark chocolate chips
- For the piping mixture:
- 60g (1/3 cup plus 1 TBS) white bread flour
- 2 tsp powdered sugar
- 60 ml (1/4 cup) water
- For the glaze:
- 50g (1/4 cup) sugar
- 1 1/2 TBS water
- 1/2 tsp vanilla extract
Directions:
- Step 1: First, make the dough. Add all of the ingredients, except for the chocolate chips, to an electric mixer fitted with a paddle attachment – keeping the salt and yeast on opposite sides of the bowl. Knead the dough on low-medium speed for about five minutes until a smooth dough forms – it will be sticky. Transfer the dough into a large well-oiled bowl and cover. Let rise in a warm place until doubled in size – about 1 1½ hours.
- Step 2: On a lightly floured surface, knock back the dough and then knead in the chocolate chips. Divide the dough into 8 equal pieces and roll them into balls. Place them on a grease or parchment paper-lined baking sheet – spaced apart so they have room to grow. Cover this with plastic wrap or place the baking sheet in an oven bag, and let rise again in a warm place until doubled in size – about 45 minutes.
- Step 3: While the dough balls rise, preheat the oven to 400°F.
- Step 4: Prepare the piping mixture by combining all of the ingredients into a large bowl. Mix well with a whisk or fork, then pour the mixture into a piping bag.
- Step 5: Once the buns have doubled in size, pipe a spiderweb on the top of each one and bake for 10 minutes at 400°F. Then reduce the oven temperature to 375°F and bake for another 25-30 minutes. Transfer to a wire rack to cool slightly.
- Step 6: To make the glaze, combine all of the ingredients in a small pan over low heat. Stir until the sugar has dissolved. Brush the glaze onto the warm buns and enjoy! 🙂
Happy Baking!:)