What do you do when there’s no yeast in sight at the grocery store? Panic? Nope. Just make yourself a sourdough dough starter and you’ll never have to rely solely on being able to find that pesky yeast packet at the grocery store ever again (well maybe not ever again, but you know what I mean).
There have been some false rumors going around about sourdough for a while now, and it’s time to set the record straight. Some seem to think that making sourdough is only for the crème de la crème of artisan bakers, no baking novice could possibly be able to wrangle such a difficult bread, but these ill-informed people couldn’t be more wrong.
All you need to create a loaf of delicious, crusty and tangy sourdough is time (and lots of it). The tangy trademark flavor of sourdough can only be achieved through a long proving (rising) period. It sounds crazy, but the whole process of baking a sourdough bread can take upwards of 7 days (thankfully this recipe only takes about 20 hours in total).
Did you know that the earliest written record of sourdough comes in the form of hieroglyphics of Egyptians making beer and bread that date back to 4,000 B.C.? For thousands of years, using a sourdough starter was pretty much the only way to make a loaf of bread. So, if up until 1942 (the year the first active dry yeast–the kind you know of that comes in a packet at the grocery store–was created) everyone made their bread by using a sourdough starter, then there is no reason why you can’t make bread that way too.
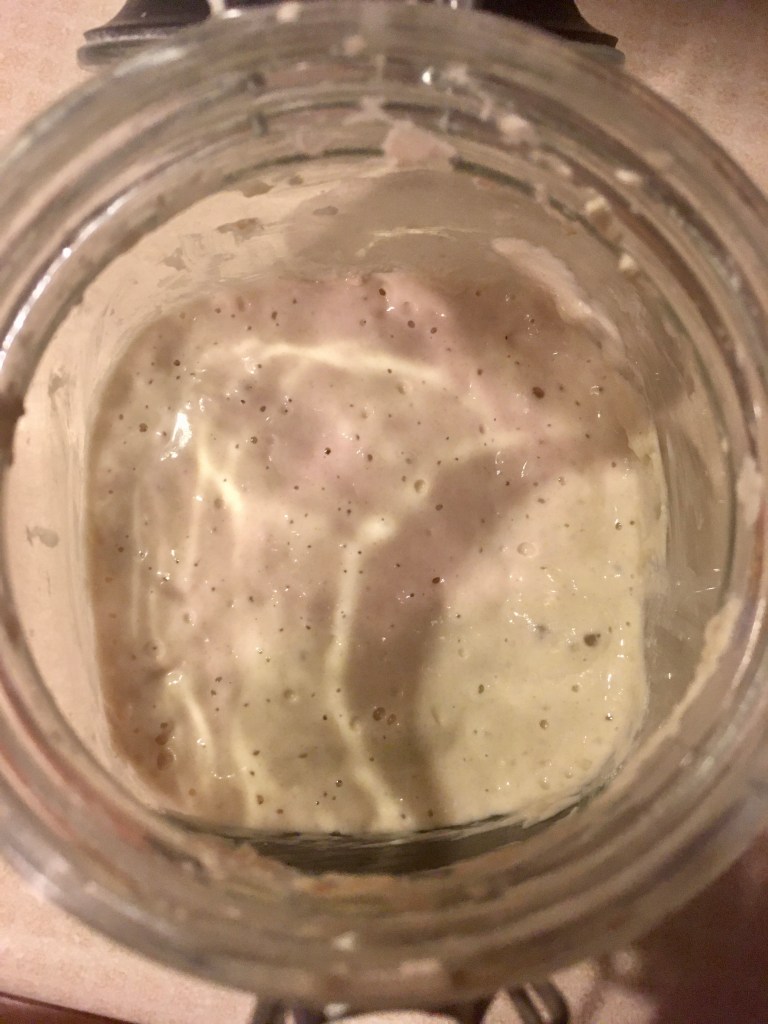
The first step to making any kind of sourdough is to make a sourdough starter. This starter is simply the combination of just two ingredients, flour and water. This flour and water mixture will eventually go through the process of fermentation, causing bacteria and wild yeast to grow. When the fermentation process begins in earnest, it will cause bubble to appear in your flour and water mixture. This bubbling mixture means that the sourdough starter is alive.
During fermentation, the bacteria that is created generates lactic acid and the wild yeast feeds off starches and flour, pumping the resulting carbon dioxide and acid and alcohol (ethanol) into the dough. This acid and alcohol (ethanol) is what gives sourdough its sour taste. That is why the tangy flavor of sourdough grows stronger the longer you proof your dough for; it simply has more time to give off even more ethanol (sorry for the science lesson, I’m done know).
On day one of making your starter, combine 60 grams of whole wheat flour and 60 grams of water in a glass jar. Mix the water and flour together with a fork and then cover the jar loosely with a cloth (I like to use a piece of cheese cloth) or with the jar’s lid just set on top (not twisted on). Leave this in a warm spot for 24 hours.
On day two, there might be some small bubbles that have popped up on the surface of your starter. These bubbles mean that fermentation has started (yay!). Sometimes, you won’t see any bubbles just yet and that’s totally fine! Don’t do anything to the starter today, just let it sit for another 24 hours.
It’s day three. You’re starting to get antsy, aren’t you? Hold tight, you still have a couple more days before you can actually use your starter. But at least today you get to feed your starter again. To do this, first take out and discard about half of your starter from the jar. Then add 60 grams of all-purpose flour and 60 grams of water. Mix the starter with a fork until smooth. Cover the starter again and let it rest for another 24 hours (huh. Sounds like my life: wake up, eat, sleep, repeat).
Okay, now it’s going to feel like Groundhog Day for a bit. On days 4, 5, and 6, you’re just going to repeat day three’s feeding process (take out and discard half of your starter and then feed it with 60 grams of flour and 60 grams of water). The starter will start to rise and bubbles will pop up on the surface and throughout the starter as the yeast begins to develop. Here’s a little nugget of information, when the starter falls, this means that it’s time to feed it again.
On day seven, you’re probably ready to just say, “Forget it. It was a nice idea, but I’m bored now.” But guess what? If your stater looks like it’s doubled in size and there are tons of bubbles in it, then it’s officially alive! Congrats! You’ve officially given birth to a gen-u-ine sourdough starter (if you didn’t instinctively say ‘genuine’ in a slow southern drawl in your head when you saw the hyphens, then I don’t think we can be friends)!
If your started hasn’t doubled in size and there aren’t a lot of bubbles yet by day seven, don’t freak out. This just means that your starter needs a little more time to mature. Keep feeding it once a day and soon it will reach this stage.
One last thing, make sure you keep your jar clean (wipe the sides off every now and then) and before you use the starter in a recipe, make sure it passes the float test. To check to see if your starter passes the float test, after the starter has been fed and it has doubled in size, drop a teaspoon of starter into a glass or bowl of water. If the starter floats to the top it’s ready to use, if it sinks to the bottom, the starter needs more time before it can be used.
Okay, I lied. One more thing, if you keep your starter at room temperature, make sure you are feeding it everyday. If you are keeping it in the fridge, make sure you bring it out, remove and discard all but 50 grams of the starter and feed it, once a week.
Now, on to the moment that we’ve all been waiting for; making the actual sourdough bread. I’ve tried out a lot of sourdough recipes and by far, this is my favorite base sourdough recipe. It comes from the book, How to Bake, by Paul Hollywood (he’s a butt, but you have to admit, he does know a thing or two about bread). I always just cut this recipe in half because I only ever need to make one loaf (but if any of you ever want me to make you a loaf too while I’m making my own loaf, just let me know). Again, this recipe is in grams and millilitres, so please, please buy yourself a digital kitchen scale.

You can’t go wrong with a simple, plain sourdough bread, but sometimes I like to spice it up a little. I like to add about two or three teaspoons of pre-minced garlic (from a jar) and a tablespoon or two of rosemary (just the dried kind from a spice jar), for a garlic and rosemary loaf. One time, I even substituted the water for tomato juice in the recipe and added some garlic too. I ended up with a tasty tomato and garlic loaf that I have to say was pretty darn good. Sometimes, if I’m not feeling lazy, it’s really good to roast a whole clove of garlic and then put that in the garlic and rosemary loaf instead of the jarred garlic (just an idea for you to play around with). But honestly, you can add whatever your little heart desires to this basic sourdough recipe and it should taste fantastic!
You can add more water to this if you’re more experienced in sourdough making (a dough with higher hydration will give you a crumb structure that is more open and airy, but will also result in a dough that is harder to work with), but sticking to the lower water option produces a load that is just as nice.
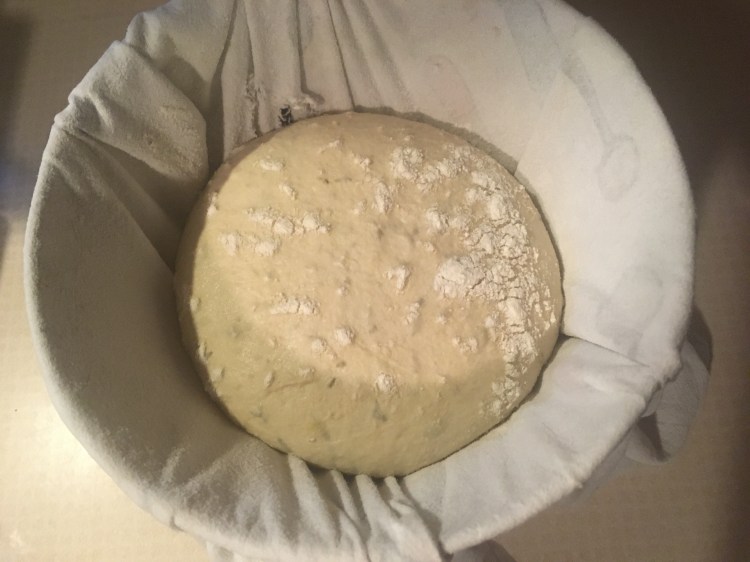
If you don’t have a fancy banneton (proofing basket) for your second proof, you can just do what I do and modify a large mixing bowl. To do this, I place a heavily floured cloth/towel (the towel should be damp and then floured. Rice flour works best to coat the towel in as it has a grainier texture than normal flour. This more granular texture helps to avoid the loaf from sticking to the towel when it’s time to turn it out onto the baking sheet) in the bowl so that the towel isn’t touching the bottom of the bowl, and then put a rubber band around the bowl to hold the towel in place. This will enable the dough to sit in the towel suspended above the bottom of the bowl. Suspending the dough in this way will cause the dough to better hold its shape when it’s time to bake the bread (kind of like muscle memory).
Another point, some people like to bake their sourdough in a dutch oven because it is the closest you can get to mimicking a fancy steam-injecting oven without actually having one. To do this, put the dutch oven in the oven with the lid on while the oven preheats to 450 degrees F. Once the oven has reached this temperature, take out the dutch oven, add the bread, put the lid back on, throw it in the oven, and turn the oven temperature down to 400 F. After 20 minutes, take off the lid and bake for another 30ish minutes. While I love the great crust that you get from using a dutch oven, then bottom of the bread always burns when I cook my bread in one. To prevent this, you could place a cookie sheet on the oven rack beneath the dutch oven and it should do the trick.
You could also skip the dutch oven all together, instead, cooking your bread on a cookie sheet. If you choose this route, I would recommend that you place a roasting pan on the bottom oven rack when you preheat your oven. Then, when you put your bread in the oven, carefully pour about 1 and 1/2 cups of boiling water into the roasting pan below the bread and shut the oven door (do this all very quickly as you don’t want the steam you’ve just created to escape). This process, just like cooking your bread in a dutch oven, will help to create the moisture needed to develop that nice, thick crust that you want for your sourdough.
And that’s literally all I have for you about sourdough. The only really tricky part about baking sourdough is not to rush the process. Sourdough bread takes time; it’s part of its beauty.
Okay, I just have to slip in this one last fun fact about sourdough before I leave you. Did you know that there’s actually a sourdough library in St. Vith, a village in Belgium, that preserves strains of sourdough for the future? I know. Crazy, right? Here’s a NYTimes article about it: At the Sourdough Library, With Some Very Old Mothers.
Here is the super simple sourdough recipe:
Makes 1 loaf | Total time: about 17-20 hours
Ingredients:
- 375 grams white bread flour
- 250 grams sourdough starter
- 8 grams of salt
- 175 – 225ml lukewarm water
- Olive oil for kneading
- 2-3 tsp garlic from a jar (optional)
- 1 – 2 TBS dried rosemary (optional)
Directions:
Step 1: In a large bowl, put in the flour, starter and salt. Then add in 175ml of the water and mix together with your hands (adding more water if you need to). Mix until it has become a soft, rough dough and all of the flour has been picked up from the sides of the bowl.
Step 2: Coat a clean worksurface with a little bit of olive oil and then tip the dough onto it. Knead the dough for 5 – 10 minutes. There will be an initial wet stage but keep working the dough and eventually the dough will form a soft, smooth skin. At this stage, if you want, gently knead in the garlic and rosemary.
Step 3: After kneading into a soft, smooth skinned dough, place it into a lightly oiled bowl and cover tightly with plastic wrap. Leave the dough to rise for 5 hours, or until it has doubled in size.
Step 4: Cover a damp towel with a heavy coating of rice flour (preferably) or regular flour. Then place the towel into a clean, deep bowl with the ends of the towel draping over the sides of the bowl. Make sure the center of the towel (in the center of the bowl) isn’t touching the bottom of the bowl, this way, when the dough is dropped onto the towel in the bowl, it will be suspended in the air, which will help it to hold its shape when baking later on. Then put a rubber band around the bowl and towel, securing the towel in place. This is a homemade bread banneton. If you have a bread banneton, just use this, heavily floured.
Step 5: Tip the risen dough onto a lightly floured work surface and fold it inwards repeatedly until the dough is smooth and all of the air has been knocked out. Turn the dough in a circular motion on the work surface to form the dough into a smooth ball shape.
Step 6: Place the dough ball into the banneton and dust with more flour on top. Put the banneton with the dough into a plastic bag (I use a large oven bag) and leave to rise for 10 – 13 hours, or until the dough has doubled in size and springs back when poked lightly with your finger.
Step 7: When the dough is ready, put a roasting pan in the oven on the bottom rack and preheat your oven to 400º F. Line a cookie sheet with baking parchment and bring 1 and ½ cups of water to a boil.
Step 8: Turn the risen dough upside down so the wrinkled underside is on top. Put the loaf onto the cookie sheet and cut a deep slash across the middle of the loaf.
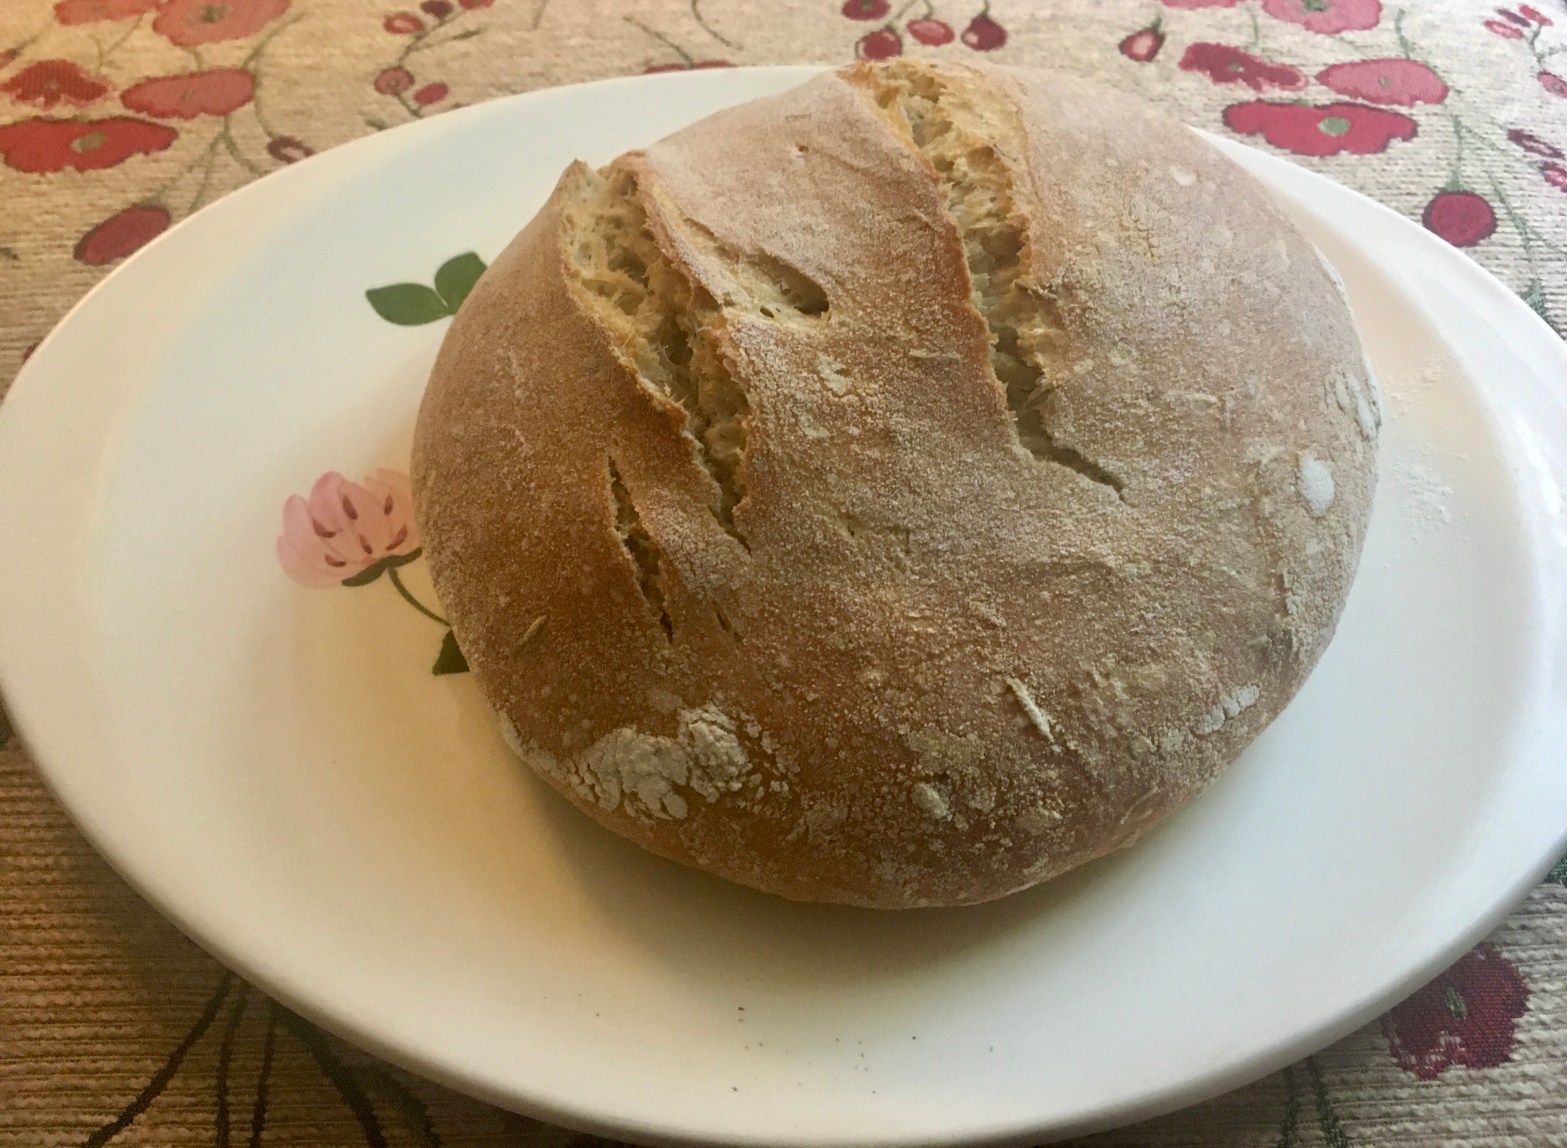
Step 9: Place the loaf into the oven. Then pour the boiling water into the roasting pan on the lowest oven rack, beneath the loaf, and shut the oven door. This will create the steam in the oven needed to achieve a heavy crusted bread (do this step as quickly as possible as to not let out too much steam from the oven). Bake for 30 – 40 minutes until the loaf is golden brown and sounds hollow when tapped on the bottom. Cool completely on a wire rack before digging in.
**You can also bake the bread in a dutch oven. When you start preheating your oven, place your dutch oven into the oven with the lid on. After 30 – 45 minutes (assuming the oven has heated up all the way), take out the dutch oven, line it with parchment paper and place the loaf inside. Then put the lid back on the dutch oven and put it back in the oven. Place a cookie sheet into the oven, as well, on the lowest oven rack (this will prevent the bottom of the bread from burning in the dutch oven). Bake for 20 minutes with the lid on and then take off the lid and bake for an additional 10 – 20 minutes, until the loaf is golden brown and hollow sounding when tapped on the bottom.
Happy baking!:)